Berwickshire Coast Path – Two day ‘fast & light’ walk

Berwickshire Coast Path Overview Map

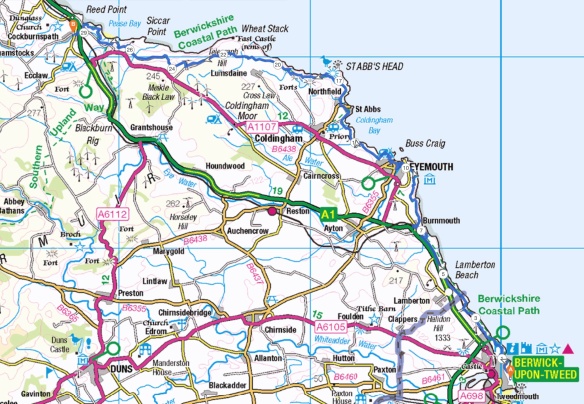
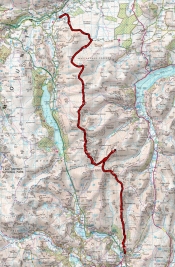
The Berwickshire Coastal path runs from Berwick upon Tweed to Cockburnspath covering a distance of 30 miles. Despite walking along the top of impressive cliffs, which would not look out of place on the Cornish coast, the total height gain (for the whole route) is a modest 900 meters according to my map (1060 meters if you trust Wikipedia). I walked the path ‘fast and light’ over two days. My aim was to walk from Berwick to Coldingham Bay on Day One then to Cockburnspath on Day Two. In my case I overshot my proposed end point on the first day and camped instead just shy of St Abbs Head.  This proved a far nicer spot for a wild camp. One of the practical appeals of this path is that Dunbar is just a modest bus ride (28 min) from Cockburnspath making it straight forwards to get a fast train (25 min) back to Berwick should you have parked there, as I had, or onwards to home if you have used public transport all the way. Buses only currently run this route on weekdays, so I had to take a taxi to Dunbar as I did the walk over a weekend.

Conclusion

The path had been recommended to me as “Cornwall without all the people” with which I concur. I thoroughly enjoyed all but the final 20% of the route. It is pleasingly dramatic, far more so than the Northumbrian coast path which I walked in 2021. Where I to walk in this area again, I would combine the best of both paths and start from Beal (Opposite Lindisfarne) and walk to Oatley Hill, itself ca. 2 miles beyond St Abbs head. Some of the most impressive cliffs are to be found in this ‘final’ two mile stretch and are thus not to be missed. The official route then becomes less attractive as it takes a big dive inland, and in composed of a tidy bit of road walking interspersed by very muddy fields.

The Details

Day 1 – Berwick-upon-Tweed to just shy of St Abb’s Head (17 miles, 450 m height gain)

I had driven to Berwick the previous evening and slept in the van on a back street not far from the Railway Station. This enabled me to get an early start and enjoy the best weather of the day. I was soon at the coast

PXL_20240316_074754156

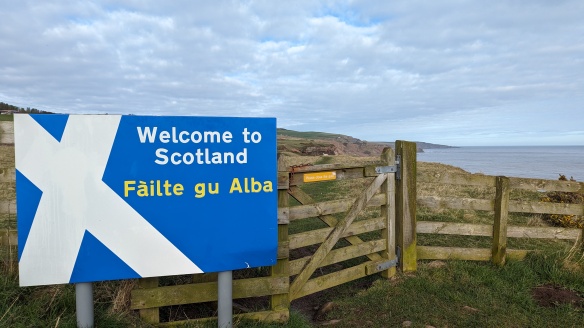
The first part of the path is pleasant rather than dramatic, but the sky was clear and blue and it was early enough for no one else to be around so I revelled at being out in the sunshine. Just over five miles brought me to the Scottish border.

PXL_20240316_091354520

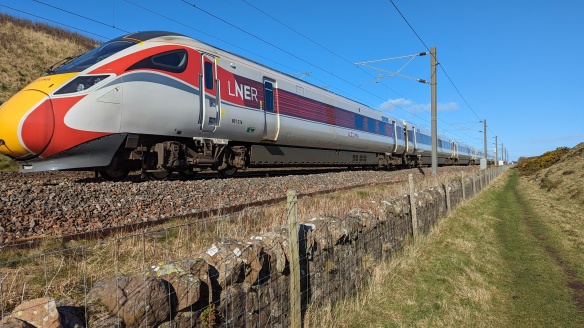
From this point on, knowing that I had the freedom to wild camp almost anywhere was liberating. Soon engineering marvels outdid the natural splendour as the path ran right next to the East Coast Main Line.

PXL_20240316_100539197

As you come level with Catcairn Bushes, just before you depart from being directly next to the railway, there is a flattish area protruding into the sea (NT 967,595) perfect for a wild camp and a good place to stop on the amended route I mentioned above. Water could easily be collected en route from one of a number of taps at the static caravan park passed three miles prior to this point. From here the path wiggles down to an unusual coastal hamlet – Burnmouth – which is built right under the cliffs and a stone’s throw from the sea.

PXL_20240316_104518240

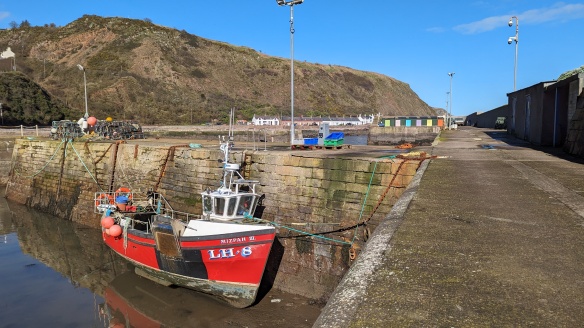
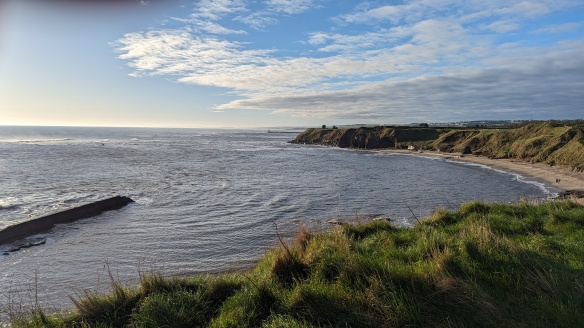
The character of this little settlement really reminded me of the fictional village of Greystone in Ann Cleeves novel “The Raging Storm”, where the detective and his team are cut off in the village by wild seas. I could very much see that happening here in Burnmouth too. At this point you leave the railway well behind and enjoy some splendid cliff architecture all the way into the small fishing town of Eyemouth.

This slideshow requires JavaScript.

The bronze sculpture is a memorial to the loss of 129 fisherman and 20 boats in a great storm of October 1881. It depicts the widows and bairns looking out to sea mourning the loss of their husbands and fathers.

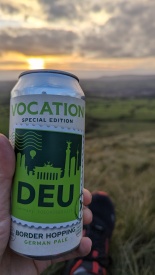
In Eyemouth I can recommend The Ship PH if you feel the need of zymological refreshment. For me, it was a chance to shelter from a strengthening wind and open out my map and plan the rest of the day. I was so far ahead of plan that I wanted to locate an alternative camping spot another 2-3 miles past my proposed end point.

This next section was also very picturesque…

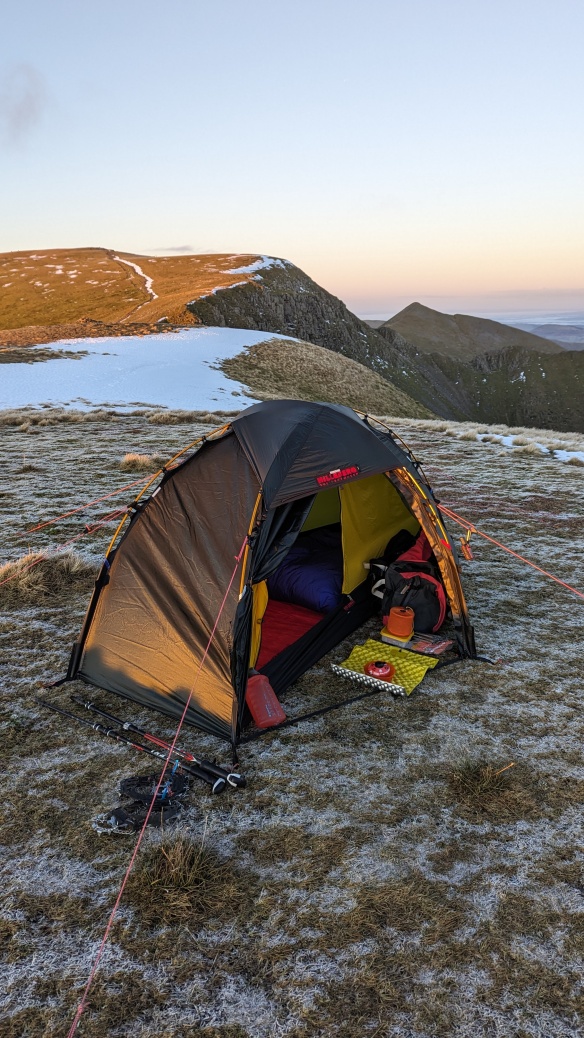
Once I was past the village of St Abbs I started to look for a pitch for the night. The wind was now very strong and my shelter for the night only good for winds up to around 30 mph. I needed to find somewhere that would offer some protection. There were some beautiful exposed pitches which I would have used with a more storm worthy tent, or on a calmer evening. However, I found a lovely sheltered pitch in the lea of Wuddy Rocks within sight and smell of the white topped waves of the North Sea.

PXL_20240316_162824984

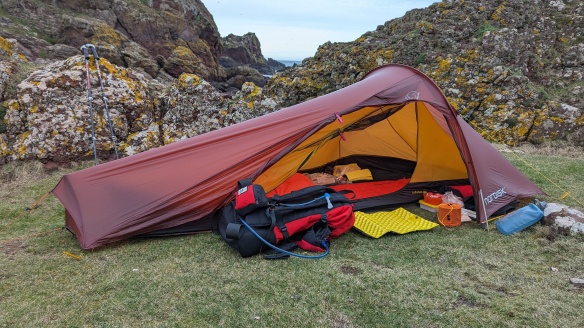
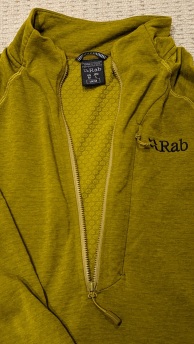
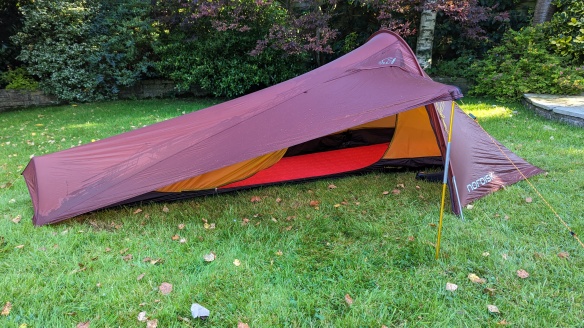
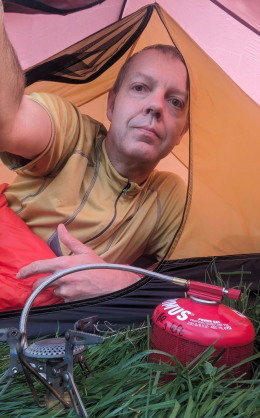
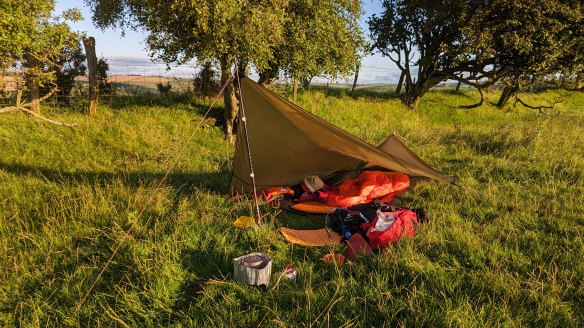
This is the third two day walk I’ve done with my Nordisk Lofoten. To call it a tent is something of an exaggeration, it is the antithesis of the Tardis in that it is actually far smaller than it looks in the photo! However, it is far more comfortable, dry and warm than any tarp or bivvy shelter that I have ever seen or used. And, at 600g, including a polycro footprint, proper pegs and all the guys (not all of which are included in the advertised weight of 490 g), it is lighter than any of these less satisfactory shelters. Indeed, I am coming to love it for walks like this one. The fact that lying down was my only option did not seem a hardship after walking 17 miles along the coast with a 9 kg pack. Half an hour after finishing my dinner, I was ready for sleep.

Day 2 – St Abb’s Head to Cockburnspath (12 miles, 420 m height gain)

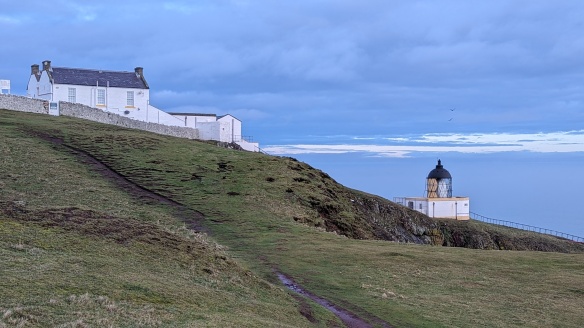
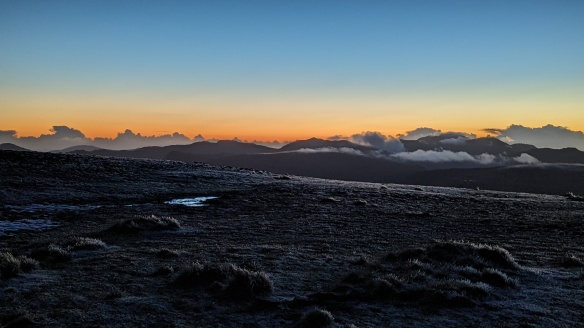
A early night (asleep before 8pm) allowed for an early start, and I was walking away at sunrise. After around 10 minutes I was greeted by the St Abb’s Head lighthouse.

PXL_20240317_065759305

The next 2 ½ miles were the most attractive of the whole walk.

This slideshow requires JavaScript.

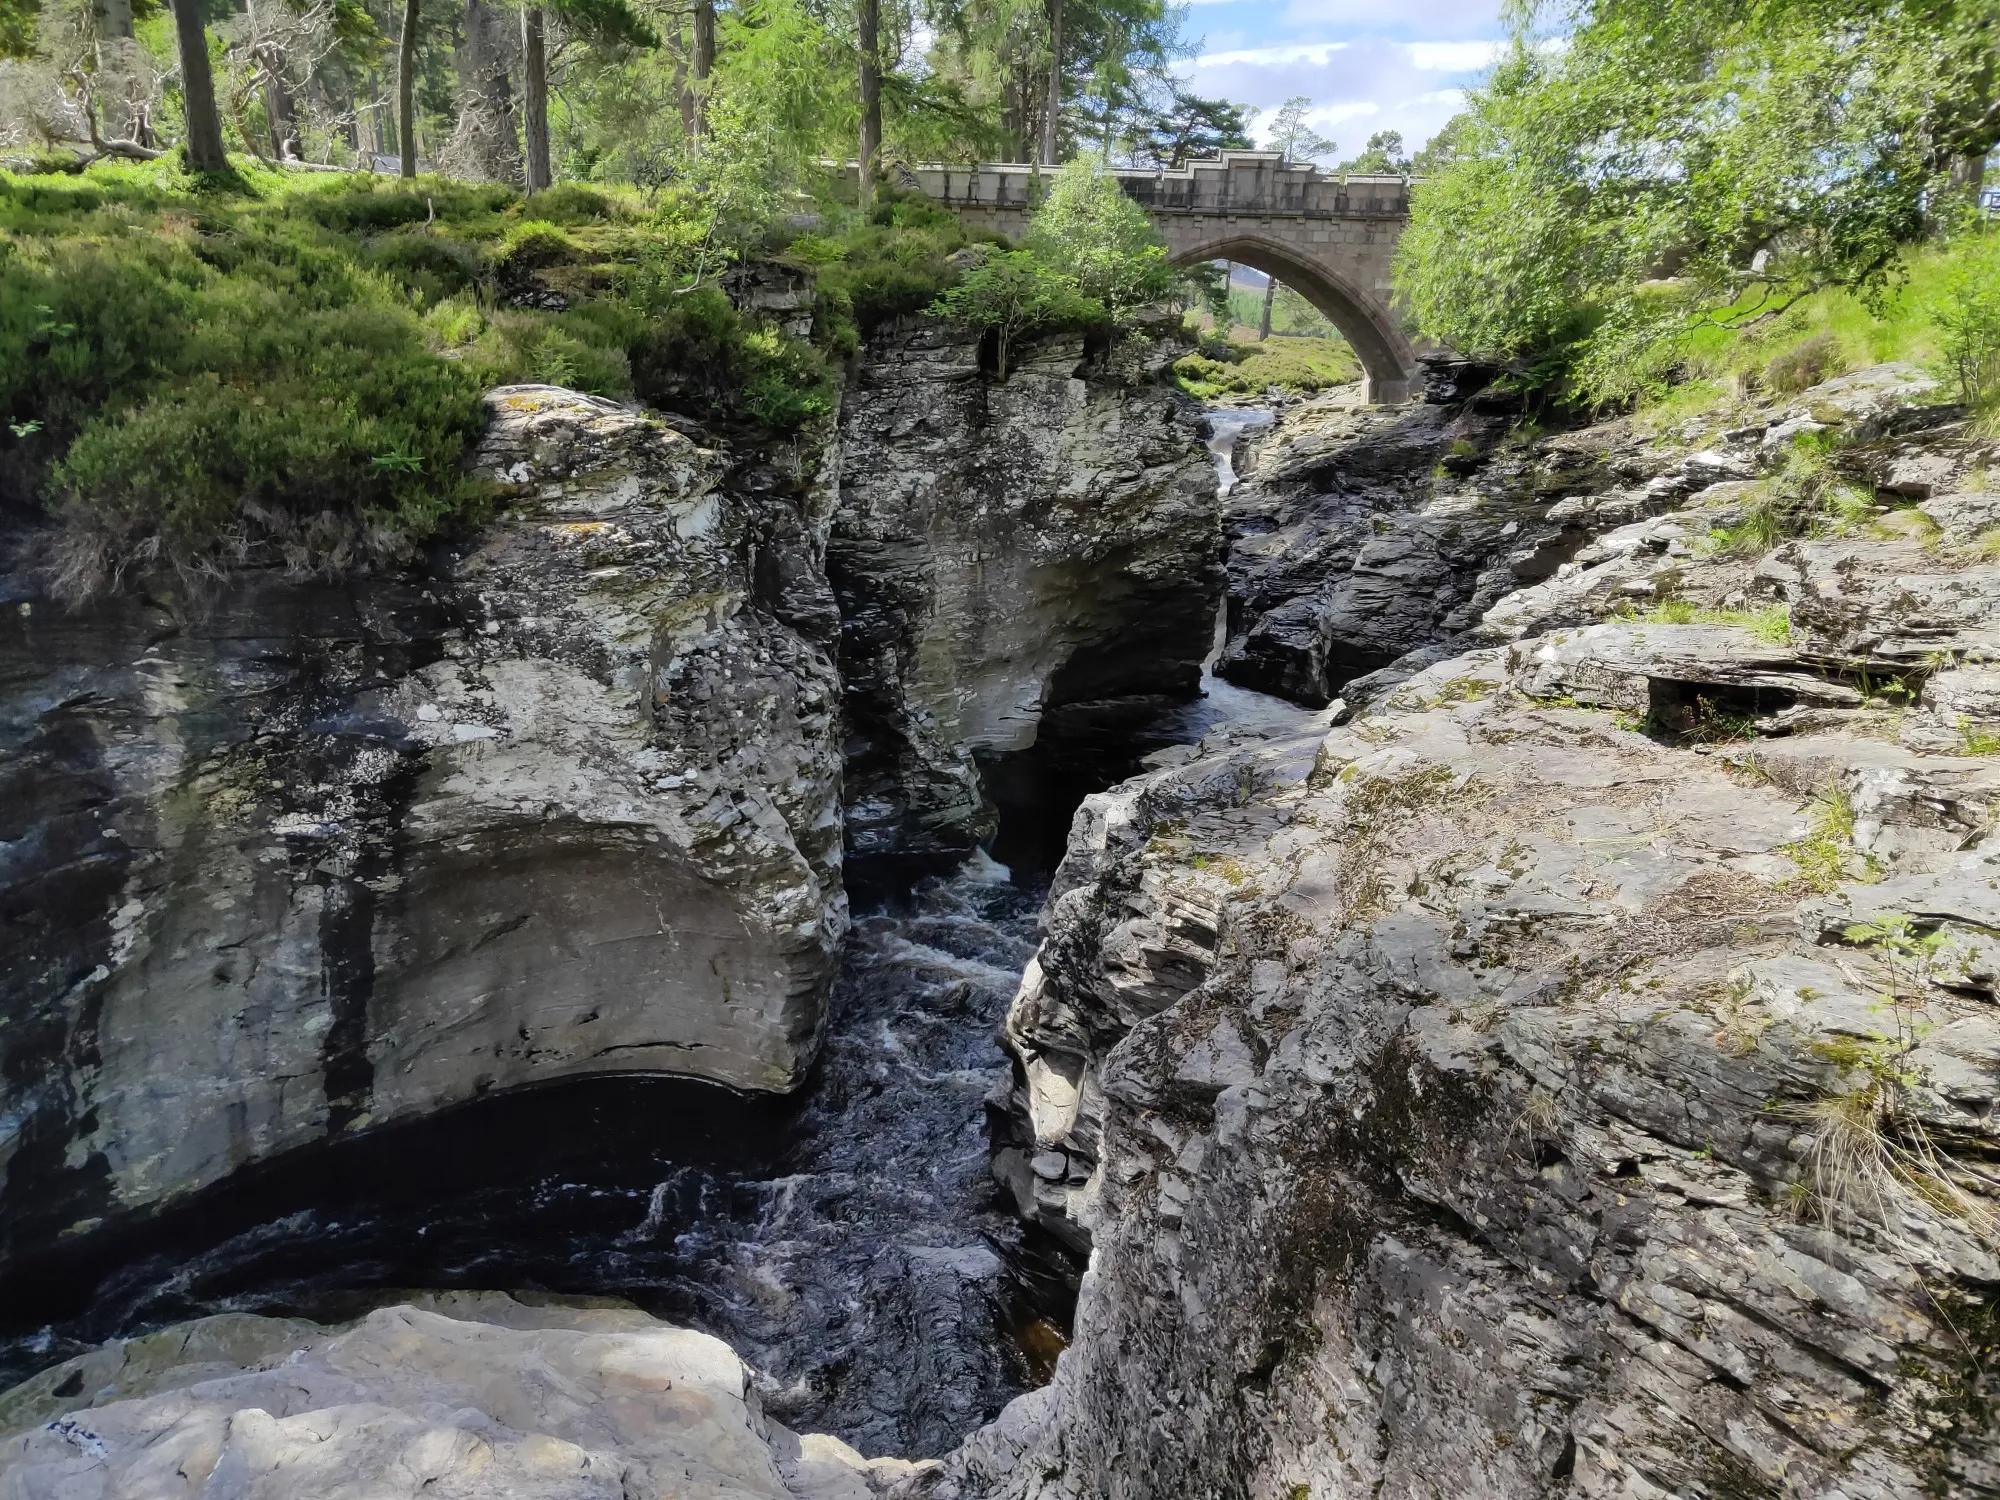
It was then a shame that the path headed inland. I missed a trick by not taking a diversion to Fast Castle which, on seeing pictures afterwards, I would recommend to anyone walking this route. It takes five miles to get back to the coast again and it is well worth stopping to look back at the cliffs you don’t get to walk along – albeit with some sense of regret on my part.

There is significant history attached to this stretch of cliffs and the geological story which they tell. James Hutton (1726-1797), often referred to as the Father of Modern Geology, found evidence to support one of his key geological theories by examination of the cliffs around Siccar Point. He would have been a controversial character at the time, as one of his conclusions was that the sedimentary rocks seen in these cliffs must, at one time, have been on the sea bed. The processes of their formation and now elevation, he reasoned, was evidence for the earth being far, far older than the 6,000 year age held to by the Christian church of the time. A Scottish Galileo?

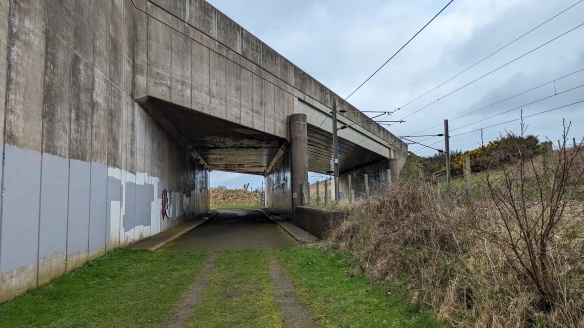
The penultimate mile was by far the most slippery (muddy) of the whole path and should be very pleasant in the summer, but not in early Spring! Then it was time to say goodbye to the coast and to my walk as I headed under the railway, then the A1 and into Cockburnspath.

PXL_20240317_123621670

As I sat in the excellent Station Yard micro-pub, opposite Dunbar station, I was able to reflect on what an fantastic two days it had been, and ponder what I would recommend to myself and others who look to try out this walk in the future – vida supra.

Addendum

If you opt to change this walk to my suggestion of from Beal to Oatley Hill, you could then retrace your steps back to St Abbs, take a bus to Berwick-upon-Tweed and then change for a second bus to Beal (link to 477) both of which are currently quick journeys by bus standards. At time of writing, both of these bus routes run seven days.

Returning to the Helvellyn range – a two day winter wild walk.

Wild Camp Route - Jul 19

Back in 2019, on what was only my fourth wild walk, I walked the Helvellyn range from Threlkeld to Ambleside. At the time I wrote “Next time I’d like to tackle it in the winter”. This post is the account of my return to this route in the winter of 2023/24.

It is really interesting to contrast the photo I took of Blencathra on each occasion

The colours of winter and the sharpness of the light added so much character to the views from the very beginning. The sun was very low in the sky (it was mid January) and it took a good 90 minutes before I ascended enough to get out of the shadow of the hills ahead of me. The walk and the views were even better than in 2019, I’ll let the pictures do the talking.

This slideshow requires JavaScript.

The ground conditions were not like anything I had experienced in my previous 34 years of hills walking. Snow was only a decoration on shaded slopes, all the rocks were free of verglas, yet because the ground was frozen so hard and topped with an powder of frost even sections of gravel path were really slippery and I was really grateful for my microspikes.

My initial plan was to divert from the ridge and camp on Catstye Cam but when I got to Swirral Edge I did not fancy climbing down the scramble in such slippery conditions with a full pack on my back. I think I would have been happy to walk up, but not down. So like last time I walked on to Nethermost Pike.

PXL_20240106_155334749

We experienced something akin to a temperature inversion that night with the temperature on the summit only being one degree below that in the valley and a mild -2 Celcius. The sunset was not Instagramable but was suitably atmospheric.

PXL_20240106_165518141

I had expected the temperature to drop somewhat lower (-6 C), so learning from previous winter trips I prepared my water for the following day before going to sleep. To keep weight to a minimum I now harvest water as I go, rather than lug it all up the hill. This time I was able to get water from a stream between Great Dodd and Watson’s Dodd (NY 340,189). Water filters are great, but can freeze easily which is not only inconvenient but could damage the tubules within them. My Hydrapak one litre bladders are different colours so I can easily tell which is potable water. I kept my filter in my sleeping bag that night and in a pocket close to my body the following day until I ran out of pre-prepared water. I also filled my cooking mug so I could easily thaw and boil this for a brew in the morning.

Being winter, it was easy to be awake for sunrise but I was initially met by low cloud. Once I got walking though, I was soon awarded with some very fine views.

This slideshow requires JavaScript.

Again the paths of the North side of the hills was frozen and slippery and I got to really appreciate how quick and easy it was to slip my Nortec micro-spikes on and off even with cold hands. I can highly recommend them and will write up a review (link to follow) when time allows.

Truly it was a gorgeous day to be up high in the hills and I loved every minute. Because there is very little by the way of steep climbs on this route, once you have attained the ridge, it is ideal for a winter two day walk as you can cover a reasonable distance even within limited hours of daylight – hasta luego!

Rab Nexus Pull-On – A review

pxl_20231230_202022001

The Rab Nexus Pull on is a lightweight mid-layer piece in a ‘pull over’ style with a deep chest zip. Two aspects set it apart from other half-zip fleece tops (i) The structure of the fleece fabric and (ii) the length / depth of the zip. It is not windproof, but this makes it ideal for layering in the shoulder seasons as well for warmth in the winter. It is my go to choice for taking on winter backpacking trips as it is ideal to wear in the tent in the morning and as a mid-layer for the first hour or two of walking when the temperatures are below zero.

The garment is made from Thermic G which is a polyester fleece with pattern of raised circles and gaps which traps warm air in an ‘reverse string vest’ type pattern.

pxl_20231230_202047190

This pattern is not just there for marketing hype, it really does work to provide a greater level of insulation vs. weight that other regular fleece fabrics. In my experience on the fell I find this top almost as effective as Polartec 200 and yet considerably lighter – 178 gsm vs. 250-300 gsm. This is great for winter walking / backpacking as is its lower bulk when stuffed into your bag.

The other positive and all too rare feature is the depth of the front zip which at 32 cm is 10-12 cm longer than most ‘half zip’ tops. This enables you keep the top on and control your temperature with the zip more of the time and minimises the number of times you need to stop to strip / replace layers. This means less delays and thus more miles covered per hour. Also, unlikely many lightweight tops it has proven robust to abrasion and has not pilled in 18 months of use.

pxl_20231230_202038955

Excellent deep zip

I find the cut of this piece ideal, it is termed athletic in fit, so not baggy, but then neither is it overly tight fitting either. It is simply really comfortable and warm. You cannot feel the flat seams when carrying heavy pack and it does not hold onto moisture. I have never got mine wet in the field (so I guess it must wick moisture well), but I know it comes out of the washing machine almost dry enough to wear. Finally it comes with a small chest pocket. This is only suitable for light items but it is a good place to store a pair of glasses or other delicate items you want to keep to hand.

At £65 RRP they are not cheap, but I’ve been so impressed I have bought a second one so I always have one available for last minute winter multi-day walks.

Alternative Yorkshire Three Peaks – A two day wild walk

In a repeat of my good fortune in Scotland in May I struck lucky with the weather for this two day walk, taking in three of the biggest peaks in the Yorkshire Dales. More than lucky, I felt blessed as this outing surpassed all of the (often excellent) walks I’ve experienced in the Dales since first going there as an student in the early 90’s. I wanted to include some scenic paths which I’d enjoyed in the past (see here and here) and thus whilst I did climb the expected Pen-y-Ghent and Ingleborough, I substituted Whernside for Fountains Fell. The latter offers fabulous views of the lesser visited side of Pen-y-Ghent as well as a commanding view down the Ribble Valley to Pendle. My route is shown below; I chose to start from Langscar Gate because in theory this would give me a great wild camping pitch at the half way point.

Route Map - alt. three peaks - Nov 23

The underlying character of the Dales with it’s limestone outcrops and pavements was perfectly complimented by sublime winter light which gave a vibrancy to the colours of the flora and fabulous definition to the shapes of the hills because of the precision of the shadows. Thus I will seek to let my photographs do most of the talking.

Day 1 Plan : Langscar Gate to Park Fell – 17 miles / 930 m HG [ Actual finish at SD 81,76 so 14 miles / ca. 630 m HG ]

Because I needed to collect my car from a local garage before setting off I was later getting under way that was ideal, starting to walk at 0915. This walk was designed to be walked ‘fast and light’ in the summer and this was the end of November, so I got a wiggle on.

The reflection of the sky in Malham Tarn was a vibrant blue

PXL_20231129_093748805~2

The wind was biting on top of Fountains Fell so I only stopped for quick photo of the cairns and the view over to Old Cote Moor and Buckden Pike.

PXL_20231129_115839332

Soon I could see the peaks which would define the rest of my day, Pen-y-Ghent and the Ingleborough / Park Fell ridge.

PXL_20231129_120431504

The view from Silverdale was of picture postcard quality. I had my lunch in the lee of a wall at the foot of the main climb up the South end of Pen-y-Ghent.

PXL_20231129_124220715

PXL_20231129_141910227
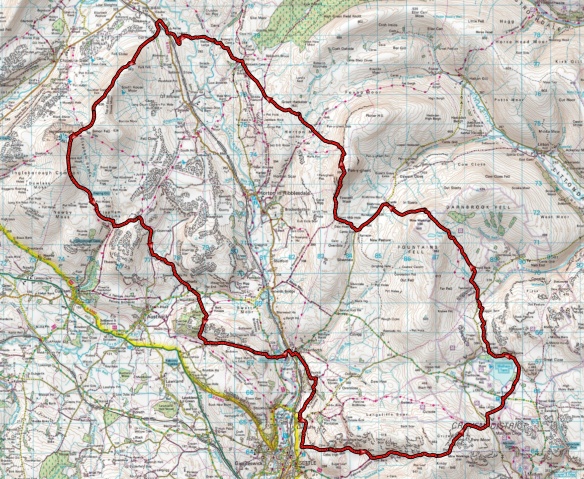
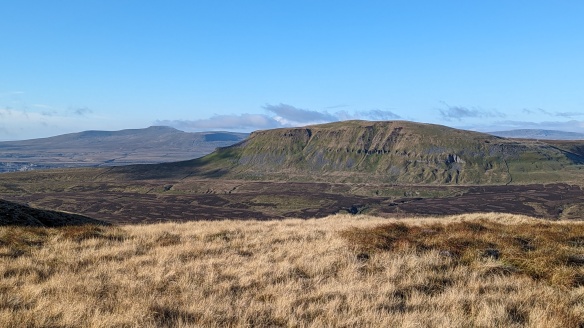
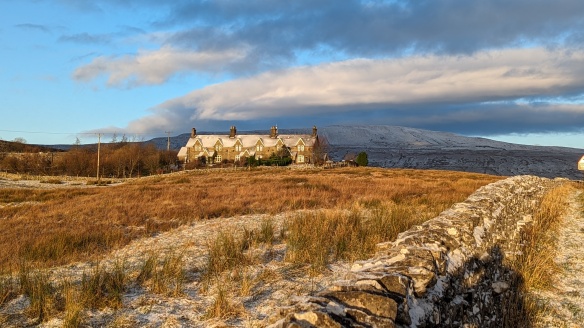
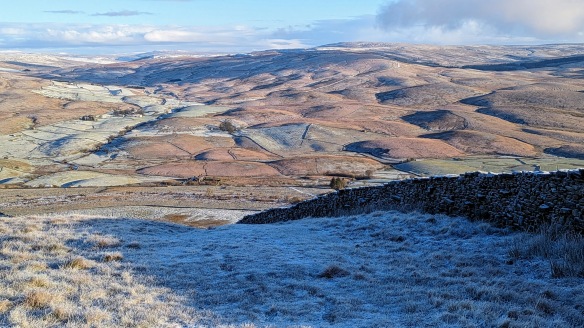
It was fresh and clear on the top, but I needed to press on.  Today’s route towards Ribblehead / the foot of Park Fell was new to me. Had it not been frozen solid this would have been a very boggy path indeed. Should I walk this route again I will take the slightly longer route via Pennine Way path which has been ‘improved’. The light was now starting to fail and I needed to decide if it was wise to ascent Park Fell and look for a camping pitch in the dark. The alternative being to stop early and extend Day Two. I knew that the end of Day Two traced the Pennine Bridleway so should be easy to follow (in the dark) so I found a suitably hidden pitch next to Brown Gill Beck. I was too close to farm buildings really, but it was rough ground rather than pasture. Pitching 20 minutes after sunset and leaving at dawn meant no one came to move me on. The view of Park Fell, where I should have been camping, was beautiful in the moonlight.

PXL_20231130_060550157

Upon reflection I still believe I made the correct choice.

Day 2 Plan : Back to Langscar Gate – 18 miles / 910 m HG [Actual 22 miles / ca. 1210 m HG]

I had hoped to hit the trail at 0730 but having cold hands slowed down my packing somewhat. There was some cloud cover but within an hour this was clearing. 1 cm of snow had fallen in the night. Sadly I didn’t get a picture of my tent with its frosting of snow, but here it is on a warmer morning.

PXL_20230904_075535368

I was attempting to walk ‘fast and light’ acheiving a pack weight of just 10 kg inc. food and water – not bad for winter gear – by use of my ‘new’ micro-tent. Previously I have used a tarp for fast and light walks, but there is no way I would have slept under a tarp with temperatures dropping to -2 C – factoring in windchill an effective -8 C.  However I slept very comfortably in the Lofoten with the outer open in tarp mode (see picture above) all night and was nicely protected from the effects of the wind. For 1-2 night fast and light adventures I am coming to love my this micro-tent. At a real world weight of 590 g it’s lighter than an ultralight tarp and accessories and has proven far quicker to pitch and much more weather resistant and comfortable to sleep within.  It is small though, and is best viewed as a luxury hooped bivvy rather than a tent.

As I set off walking, I soon saw views towards Whernside which were out of this world.

PXL_20231130_084907328

The sharp shadows cast my the low sun made the texture of the fields below Park Fell stand out.

PXL_20231130_093957945

The four mile ridge from Park Fell to Ingleborough was cold because it was in shadow and I regretted not packing my micro-spikes as some sections of path were solid ice where streams had frozen.

This slideshow requires JavaScript.

The walk into Wharf and on into Faizor then Stainforth is a favourite of mine and forms part of the Dales Highway which I enjoyed walking two winters ago.

This slideshow requires JavaScript.

Arriving in Stainforth I had two potential plans (i) To stop in the pub for a swift pint then get a taxi for the last 7 miles (having already walked fifteen) or (ii) to get my head-torch ready and enjoy a night hike. I chose option 2.

This slideshow requires JavaScript.

I got to the car at 1830, 90 minutes after last light, warm, full of joy and gratitude but with rather sore feet after 22 miles over ice hardened ground.

Epilogue.

If you haven’t guessed already I loved this walk, it is one I am sure to repeat. Clearly it would be better walked in the summer because of the need of a minimum of ten hours of sunlight each day.  That said, the quality of the winter light on the residual autumn colours (grass vs bracken vs limestone vs frost) was absolutely sublime. I plan to walk this again next winter but split it up as 3 x ca. 12-13 mile days and allow extra time to do things like go to the trig point on Fountains Fell for it’s views down Ribblesdale. Perhaps drop my kit and horse it up to the trig point of Smearsett Scar and similar fun additions. It would be good to finally camp on Park Fell too, after now two failed attempts.

Sandstone Trail – 34 miles through Cheshire & Shropshire – Walk report

PXL_20231007_084752632
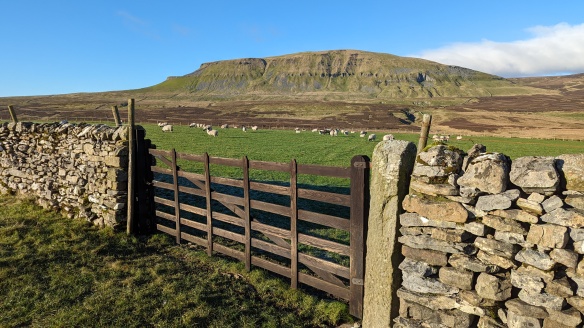
Cheshire is dominated by flat agricultural plains and the petrochemical plants of Runcorn & Ellesmere Port and thus not the first place you think of as great walking country. Thus describing this as “the best walk in Cheshire” is something of a guarded compliment and rather underplays the views and drama of this ‘medium distance’ path. The route is defined by a sandstone ridge that elevates you above the plain thus affording you far reaching views, as far as the Clwydian Range of hills in North Wales in one direction and the Peak District in the other. But you don’t need to look into the far distance for interest, when you are on sections of the ridge the Sandstone itself is both colourful and very attractive

PXL_20231007_085204552

Background & Practicalities

Running from Frodsham in the North end to Whitchurch in the South, the path covers a distance of 34 miles / 55 km and officially offers 1268 m of height gain (I measured it as 980 m). The hills are only modest in size, so the height gain is split over a number of small easy climbs making this a walk for pleasure rather than challenge.

There are train stations at both ends of the route making return travel straight forward. The journey time varies between 90 minutes and 2 hours according to the time of day and the route. Services such as shops, pubs and cafes along the route are very limited, you should carry all your own food, enough water for the day, and not expect to find convenient cafes en route.  Accommodation options normally require a short detour off of the route and a good listing can be found here.  I found two campsites close to the route, each linked to a pub, The Shady Oak near Tiverton and The Bickerton Poacher near to Bickerton Hill, both are only around 500 m off of the path.

The Sandstone ridge is most evident immediately as you exit Frodsham and around the half-way point between Beeston & Bickerton.

You should prepare yourself for a couple of really muddy sections of path. I was fortunate to walk the path after a few unseasonably warm and dry days and mostly saw areas of ‘poached’ ground which could have been very muddy but were merely soft and uneven for me. The sections just to the North of the Shropshire Union Canal and that between Hampton Green & Bickleywood were the worst. Other reports show true quagmire in these areas which I was fortunate not to experience. Carrying gaiters is recommended for the Southern half of the route.

Executive Summary

I chose to walk this path ‘fast and light’ over two days. This both enabled me to fit it into a weekend and gave me a good excuse to try out my new 590 g micro tent, a Nordisk Lofoten. I walked from North to South as I live North of Cheshire, and this did put the best scenery into the second day. Saving the best for last always works well for me as you appreciate all that you see rather than being first spoilt then underwhelmed if you do the reverse. I had a really enjoyable two days and would reckon this trail to equal or exceed the best low level, inland waymarked paths which I have walked in the past ten years.

Highlights – Day 1 : 16 miles / 470 m height gain

The views over Ellesmere Port are impressive

This slideshow requires JavaScript.

You soon get up close and personal with the Sandstone and see its use in local buildings

This slideshow requires JavaScript.

Delemere Forest was very attractive but it’s a good one mile diversion off of the path to get to the cafe.

PXL_20231007_110314422

There were plenty of waymarkers, with only a couple did leave me scratching my head and referring to my GPS guided map.  The final fields before the Shropshire Union Canal can be really muddy, but fortunately the maize was sucking all the water when I walked the path

The day ended well with an enticing view of Beeston Castle (which I would walk past the next morning) and beautiful canal architecture.

I stayed at the campsite attached to The Shady Oak pub. I would only suggest camping here when you expect the site to be quiet as I could only find two level pitches on the whole site. I only spotted two possible wild camping possibilities on the whole route, and both would have required pitching and striking with the setting and rising of the sun as they were day-walker honey pots. Drop me a comment if you want to know more.

For fast and light walks such as this I have moved on from a tarp (because I did not like the lack of wind protection) to a Nordisk Lofoten “Micro Tent”. It offers minimal space inside (see my full review here) so should really be compared to a hooped bivvy or a tarp, but against these it wins hands down for me so far…

This slideshow requires JavaScript.

Highlights – Day 2 : 18 miles / 510 m height gain

The sandstone ridge is far more in evidence on the Southern half of this trail. The views, the native woods and the sandstone itself were all a great delight. The morning of day two was definitely the best part of the route – I really enjoyed it.

This slideshow requires JavaScript.

After you descend from the wonderful views from Maiden’s Castle you have five miles of uninspiring farmland before reaching the next section of interest. At this point there is the Willeymoor Lock Tavern and the boats and locks of the Llangollen canal to enjoy. Sadly the pub operates traditional hours and is closed 1430-1800 so I missed out on the chance of a pint.

This slideshow requires JavaScript.

Nordisk Lofoten (ongoing review) – a fell side test night with beautiful skies.

Pendle viewed from Waddington Fell.

There are three spots on Pendle where I like to enjoy an overnight micro-adventure. One is good for storm testing, one is ideal when I go up with Junior and then there is a small flat ledge at 440 m which has the best view, but has only just enough space for a solo tent.

PXL_20230923_174402776

No one in the UK can have missed what a wet year it has been. So whilst I continue to wait for a dry weekend for an autumnal wild walk, I saw the forecast of a sunny afternoon, with rain only during the wee hours. I wanted both some head-space and the chance to test out my new micro-tent, a Nordisk Lofoten so I packed a bag and headed out after tea. For my detailed preliminary review of this micro tent, click here.

The Lofoten is best thought of as a luxury hooped bivvy rather than a tent, so some experience is required to know how to best work with it given that it is not tall enough (70 cm) to sit up within. There are a number of micro-tents on the market now from Nordisk, Terra Nova and Vango, but that which is easiest to pitch and has the smallest pack size is the Lofoten. All these ‘tents’ are side entry, which when you compare to a hooped bivvy has a range of advantages:

  • Easier to get into / out from
  • Much less claustrophobic
  • A porch to store your boots and waterproofs within
  • Better views of your surroundings.
  • Space to get dressed (with a free yoga session thrown in!)

pxl_20230923_175301905
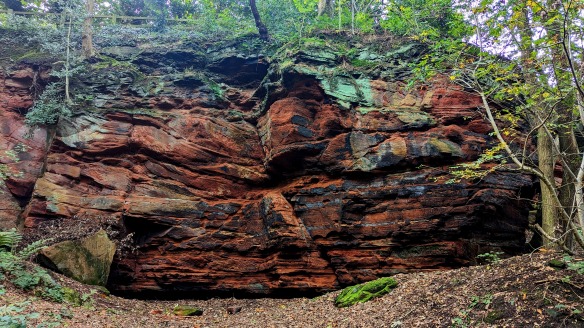
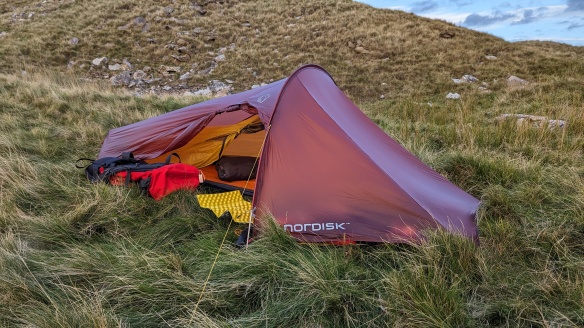
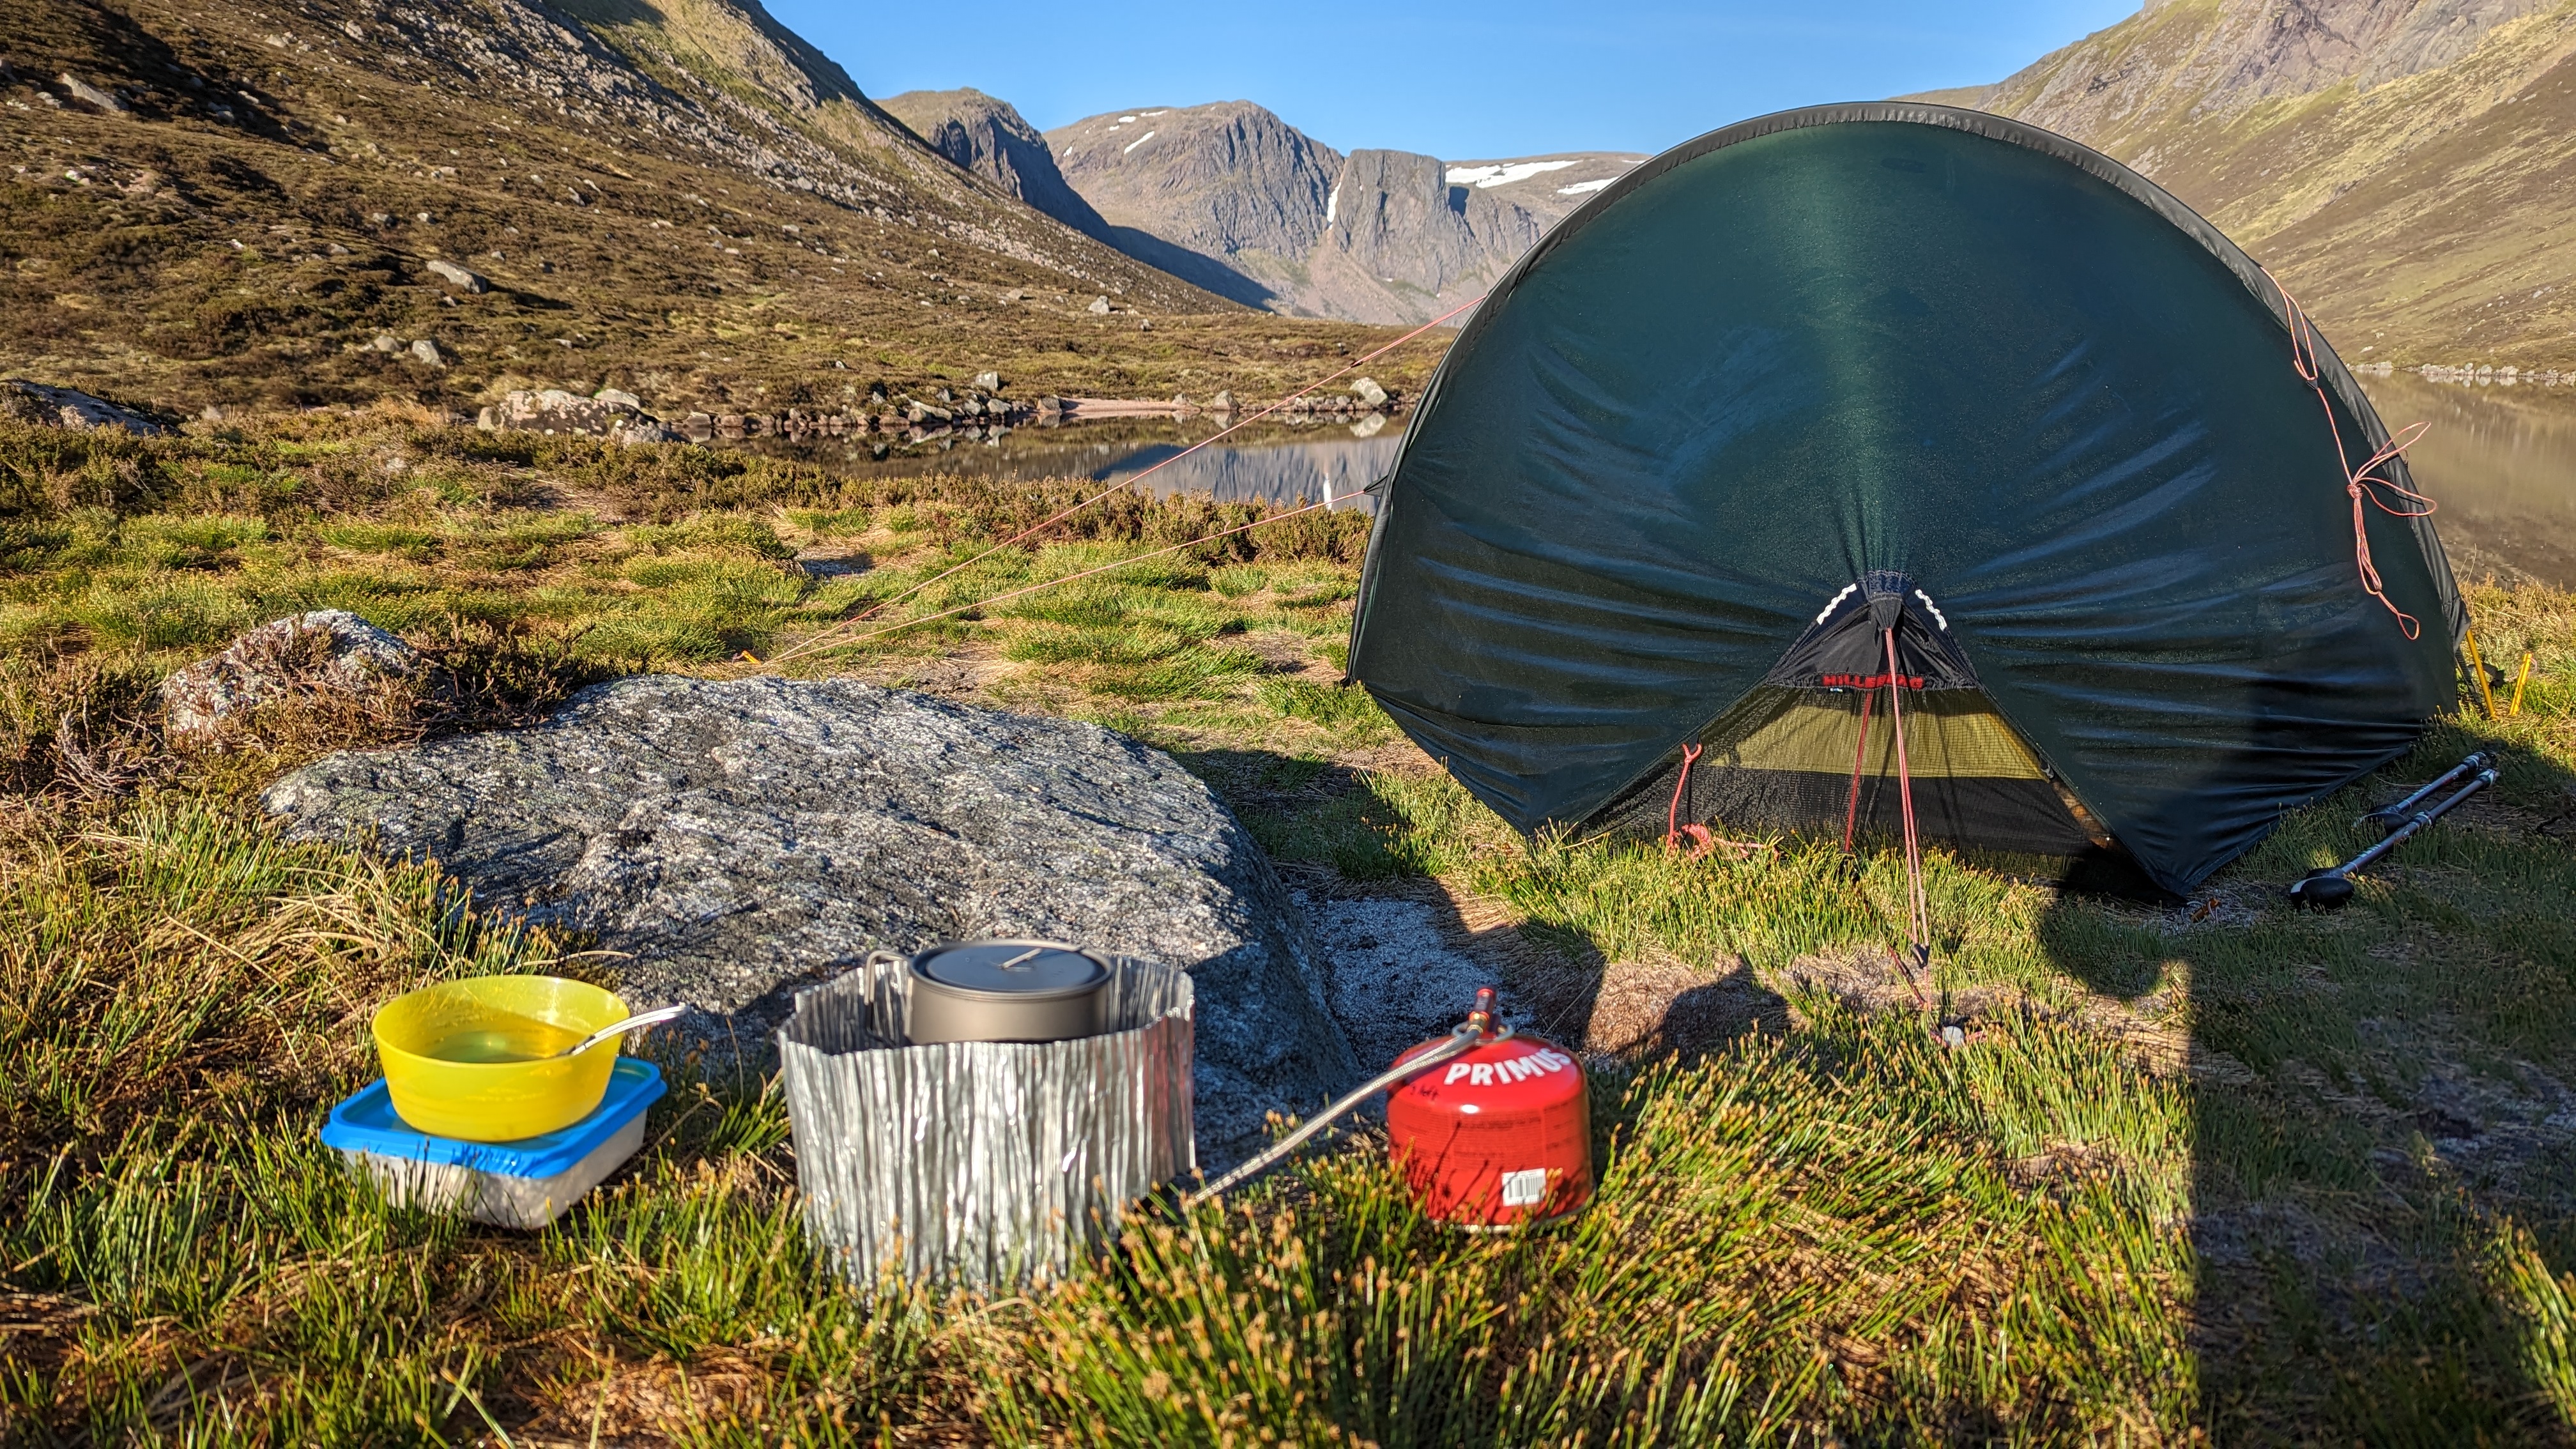
A game changing feature of the Lofoten is being able to use the door as a tarp which gives you covered space to cook under, so long as the wind is not too strong (≤ 20-25 mph).

PXL_20230904_075535368

Additionally, it has a pole sleeve for the main pole and not Velcro tabs so it is far far easier and quicker to pitch. It was great just to sit out of the wind (in the open porch) and enjoy seeing the sun set and the lights of the town start to illuminate.

The sky would not have won photographic prizes, but together with the peace and isolation of altitude that half hour was music for my soul.

This slideshow requires JavaScript.

So what did I learn about my new micro-tent?

  • Pitched with the correct orientation to the wind it was much more capable than I imagined. The wind was rather stronger than I was expecting, gusting to around 35 mph at 0200. (In future I would seek a sheltered pitch if winds above 25 mph were forecast, had the wind swung around to ‘side on’ it could have been a different story)
  • The combination of heavy rain and driving wind did not lead to any water ingress.
  • Even though the temperature dipped to 9 C and I had the door fully closed, the catenary cut of the fly looks to work, as I had zero condensation.
  • It is much easier to enter, exit and get dressed within than under a tarp.
  • The porch could accommodate my boots, waterproofs and a 40 L pack, so long as I was prepared to store the pack on my exit route and move each time I wanted to get in / out. Had my pitch not been sloping L2R I could have reduced the width of the inner (it is designed to do this) and given myself more porch space. This is the first night I have closed the door and I was pleasantly surprised with the size of the porch – yes it is petite, but it is not Lilliputian!
  • I could pack up everything other than my Thermarest without getting out of the tent or opening the door.

Questions which still need to be addressed:

  • How to manage the challenges of entry and exit in heavy rain (I have a plan, but will it work?)
  • Limits to the weather conditions which would allow you to use the door in ‘tarp mode’ and thus have a covered cooking area.
  • When will there be a dry enough weekend to facilitate a two day wild walk I the Dales without the tops being obscured by cloud?!?

Nordisk Lofoten ULW solo tent – a review

Could it be suitable as a ‘Fast & Light’ backpacking / bike-packing shelter?

Background

Lofoten vs. 1 litre bottle

Lofoten – packed volume = 2375 ml

I started experimenting with a Hilleberg Tarp 5 as a ‘fast and light’ backpacking shelter last year. The first three day trip went well, but using it on my more recent five day walk along the Offa’s Dyke Path was far less satisfactory. Whilst it was a secure shelter that kept my kit and myself dry on some very wet nights, it did not provide the level of protection from the wind which I now understand that I desire. Since I have very much enjoyed carrying a 35 L / 8 kg pack for certain multi-day walks, I set about researching alternative low weight / low volume shelters that might better meet my needs & desires. I settled on the Lofoten

This is an initial review of the Nordisk Lofoten after pitching for a few test nights, either in the remote wilderness which is our back garden, or atop a local fell.

User Requirements:

Essential features

  • A shelter that can keep out heavy rain and moderate winds

  • Pitches quickly & easily

  • Very low packed volume (to enable use of 35 L pack for 3 day walk)

  • Weighs < 700 g inc. all components (pegs, guys, bag etc)

  • Provides reasonable shelter for cooking in the rain.

  • Ten year lifespan at 8 nights use per year

  • Holds it’s value so I can sell on without too large a loss (this is a niche item I’ll either love or hate)

Acceptable compromises

Review – Space  (Score – see below )

PXL_20230902_110228501

The Lofoten is the antithesis of the Tardis; one’s first impression is that it looks a reasonable size but that myth is soon dispelled when you get inside. This is very specialist shelter, made for the mountain marathon market, meaning that it does the very minimum to meet their requirements for a shelter – a two layer tent with a sewn in groundsheet with enough space to lie down and sleep. For sleeping the size and design is wholly acceptable. It is a standard 220 cm long which is a good length for me at 5’ 11” (180 cm). Once lying down I had space for my sleeping bag foot-box, plus the full length of me and a spare approx. 20 cm at my head end where I could keep book, torch, phone, map etc. It has a pentagonal footprint so there is a triangular space next to the pole for your next days clothes.


…it’s really best to view the Lofoten not as a tent, but as a luxury hooped bivvy


Sensibly the bathtub extends to the full height of the inner at the foot end which should minimise the chance of dampness from the fly wetting your sleeping bag. It will stop moisture transferring from the fly, but can be subject to condensation on humid nights.  Thus I will continue with my normal practice of wrapping my windproof or waterproof jacket around my feet as insurance. I would not want to use a winter down sleeping bag in this tent as it would touch the ceiling and at least one side of the inner tent. (But then I would never have viewed this as a winter tent.). I sleep on a self inflating pad (ca. 25 mm thick) and suspect that the considerably thicker air-pads such as the Neoair might be thick enough to cause the foot-box of your sleeping bag to touch the top of the inner.  I plan to borrow an air pad to test this before I consider investing in one.

PXL_20230910_054810564
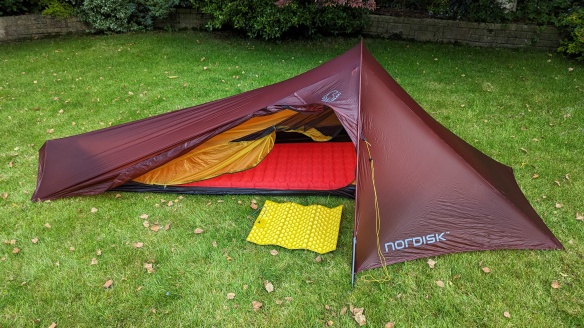
I found it easier to get undressed / dressed in the Lofoten than under the tarp, in part because the inner tent protects you from condensation on the fly and also because the height does not drop away as sharply. The “headroom” around my waist and thighs is actually greater. That said, unless you are a child you’ll not be able to sit up, the maximum headroom being a very modest 70 cm.

The unresolved challenge I see, is how one should get changed out of full waterproofs and get into the shelter if it is still raining heavily at the time. There is no porch area which is tall enough to sit in. If anyone reading this has devised a good way to deal with this issue when ‘camping’ in a bivvy bag please do leave me your advice in a comment.

PXL_20230910_054519644
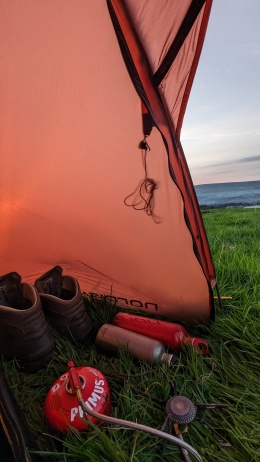
There is space for boots, stove & waterproofs (only) in the fixed section of the tiny porch – see photo. If you have the door open in ‘tarp mode’ you have lots of covered space, but if you want to keep your pack undercover it will need to be in the wide part of the ‘opening section’ of the porch and pushed out of the way when you want to get in and out of the tent.  This leaves the narrow end of the porch somewhere you are best not to store any gear.

Considering all the above, it’s really best to view the Lofoten not as a tent, but as a luxury hooped bivvy. But because the entrance is on the side rather than the end it is much easier and more pleasant to get into / out from. Additionally I do not feel any sense of claustrophobia because the tent is at it’s tallest above your shoulders, the head wall of the inner is very steep and together this means the inner is well away from your face.

An unusual, excellent and game-changing feature is being able to prop up the door with the supplied bonus pole to make a tarp like cover over the entrance. This gives a good level of protection to safely cook in the rain and is lovely to leave open all night leaving you with the views of a tarp shelter but much greater protection. I’d plan to store my pack under ‘tarp’ section knowing that if bad weather sets in I can remove the tarp pole and seal myself away from the rain. It is possible to use a fully compressed trekking pole in place of the tarp pole and save yet further weight.

PXL_20230904_075535368


…being able to turn the door into a tarp over the entrance is a game changing feature.


Score (5/5 vs a hooped bivvy, 2/5 vs a conventional tent)

Ease of pitching (Score 4 ½/5)

This tent is very easy and quick to pitch even the first time you get it out of the bag. With practice I’d expect it to take < 3 minutes to erect. It pitches with a minimum of five pegs, but I’d carry another five so you can peg down the pole ends, add the two guys (supplied) and guy out the door as a tarp as discussed above. The tent is supplied with two sets of pegs – five titanium toothpicks, with which the 490 g weight is achieved, and five decent Y pegs akin to MSR Groundhogs. Peg choice is a heated topic, but I would suggest that the Y pegs should work well in all the conditions in which you be likely to use this tent. I’ve found carrying eight of these plus two of the toothpicks to peg down the pole ends is an excellent compromise.

The inner is semi-permanently attached to the fly with Dyneema guy cord, so the tent pitches ‘all in one’ as is common with most of today’s tunnel tents. It is possible to separate the two but this involves undoing knots in 2 mm cord which is a tricky, lengthy task.

My one complaint would be the fixed length guy at the foot end of the tent. Given that this is a Si-Nylon fly which will stretch in the wet it would have been far better to have a guy runner so you could easily adjust the tension and also have the option to choose where to put the peg if you are on stony ground. I have upgraded this guy.

PXL_20230909_185929812_Annotated_Guy_Line

Weather worthiness (Score – pending)

So far I’ve only used the tent on dry still nights so it’s too early to say. That the flysheet is Si-nylon with a hydrostatic head (HH) of 1600 mm which bodes well for sheltered 3 season use. The groundsheet has a 3600 mm HH.

When you do get a breeze you are advised to pitch the head / high end into the wind so you can take advantage of the shelter of the fixed porch area. Pitched in the reverse would form a windsock!

Ventilation / Condensation (Score – pending)

So far I’ve only pitched on windless nights when we saw a swings from 25-27 Celsius in the day to 10-12 Celsius at night, so maximised condensation potential for any tent design. Thus it’s too early to assess. The catenary cut fly at the head end and a covered mesh panel at the foot should aid ventilation even if you have the outer door closed.  On one night I did see a small but appreciable amount of condensation form on the groundsheet just at the foot end of the tent, ironically this may have been due to the cooling effect of the vent in the fly at this end of the tent because I did not see any on any other part of the groundsheet.

Footprint (Score 4/5)

The footprint is about as small as could ever be possible.  The guys are modest in length vs a tarp, so the Lofoten can be pitched into very tight spaces.  Note though, that because the groundsheet is only 15 Denier it would not be happy on rocky ground without some kind of sacrificial footprint.

Also, most regular sized single hoop tents (e.g. the Enan or Laser) are symmetrical in the shape they present to the wind, the Lofoten is not.  So, if you can only find a sloped pitch you may not be able to pitch it in the correct orientation to the wind and sleep with your head above your feet.  This will probably mean hunting further for a pitch which is level or where the uphill end is into the wind.  This may present a challenge to wild campers.

Weight / Robustness (Score 3½ / 5)

The only two skin tents lighter than the Lofoten (my real world weight 590 g) are the Terra Nova Pulse (total weight* 545 g) or Pulse Ultra (total weight* 490 g).  The pitching method for the Pulse looks a real faff with the main pole being held to the fly with velcro tabs which is why I opted for the Lofoten.

Ti pegs 2 grams
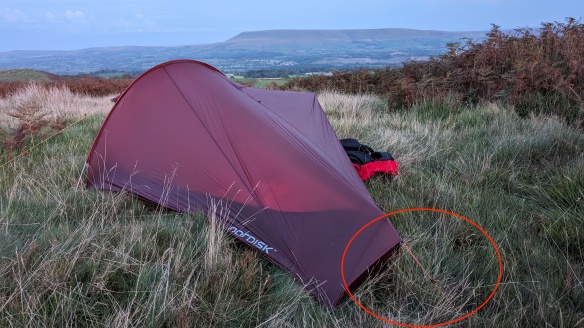
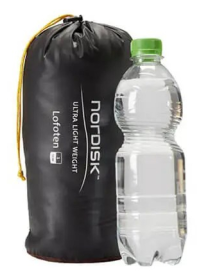
All the above *claimed weights are achieved using 2 g titanium toothpick pegs.  These are simply not practical options for real world camping – they are only really useful for use on a golfing green on a calm night!  The Lofoten was supplied with a set of toothpicks and also a set of standard Y pegs.  When I add all the guys, eight Y pegs and two toothpicks (for the pole ends) but exclude the zip out inner pocket cum-tent-bag my real world weight comes to 590 g.  That’s nicely inside the 700 g target which was the combined weight of my tarp, and accessories. Honestly, the weight, but especially the packed volume of this tent, are amazing. It’s lighter than any hooped bivvy.

The design of the tent has a curved pole (6.5 mm Al) at the head and a short upright pole at the foot.  The poles have unusually short pole sections (22 cm) which would work very well for bike-packers.  There are three guying points, one essential one at the foot and two optional ones on the main pole. All guys are provided.  To achieve both the ultralight weight and the impressive pack size ( 25 cm long by 11 cm diameter) very thin fabrics have been used, but the 7D fly still has a tear strength of 3.5 kg (Hilleberg’s Kerlon 1000 is 8 kg for comparison) and high tension points have been reinforced.  My only disappointment is the 15D groundsheet which will need me to buy or make a footprint for use on all but campsites or the aforementioned golfing green. Careful handling will be essential, but if you want something of ultra low volume this is a price which physics demands that you pay.  I am happier with thin nylon than DCF; this has now been in the market place for a while now and there are a number of reports of it having a too short a lifespan in real-world use.  Furthermore, Si-nylon packs down smaller.

Conclusions

PXL_20230910_064007799

After a few test nights I think this tent shows promise with meeting my requirements, buying pre-loved was clearly a good idea, as how I cope with the low headroom (low every-type-of-room to be honest!) is something only experience will reveal. I am impressed with how well it has been manufactured and how quick and easy it is to pitch and strike. The true test is to take it away for a multi-day walk and see what it’s like to use when I’m tired and how much hassle it is to pack a bag from inside it. Also it will be interesting to see how one manges entrance / egress in heavy rain.  It is certainly a niche design which will lead to polarised opinions. Either you / I will love it or hate it. I will write up a further review when I have the experience to know which is true for me.

If you have found this review helpful, you may also enjoy my other tent reviews:

Other shelter designs I could have considered:

Very similar micro-tent designs are the Terra Nova Pulse or Vango F10 Hydrogen both of which are within 50 g of the Lofoten. However, both use velcro tabs to attach to the main pole which seems like a lot of hassle vs. a pole sleeve. On the plus side, the Pulse has enough height to sit up if you hunch (85 cm). If only it had a pole sleeve I might well have bought one. (are you listening Terra Nova?)

The obvious alternative designs are one of the wide range of hiking pole tents now available. They offer generous headroom and much more space but usually a single skin design – a fly with attached mesh doors and skirt between the fly and groundsheet.

illusion-tent-solo-olive-10-1350x1000

Liteway Illusion Solo

A challenge with these designs is that the groundsheet is almost always made of the same fabric as the fly and thus as slippery as a well greased banana skin, necessitating a totally level pitch. The build quality of the cottage industry makers is rarely excellent and varies from tent to tent, if you are buying in the UK you will probably have to seal your own tent seams which may not appeal to everyone. If you want a whole package below 700 g without the use of DCF your options narrow considerably. The only ones I can find to meet this spec are Gossamer Gear’s “The One” at 620 g – this has the additional advantage over pyramid tents of a much easier pitching process – or the Trekkertent Stealth 1 (640 g for fly, inner and 6 Y pegs) which has the advantage of being UK made and supplied with sealed seams.


Offa’s Dyke Path – walking the hilliest section ‘fast and light’ – Welshpool to Pandy

PXL_20230806_095543348

Back in the late 8th Century AD – Offa – the King of Mercia had had enough of trouble with the Princes of Wales. Offa’s kingdom covered what today we could call The Midlands, Shropshire and the Home Counties and thus abridged the whole border with Wales. He set about having an earthwork built – a earthen dyke – along the whole length of the Welsh border where natural defences such as rivers and mountains did not already mark and protect the boundary.

Roll forwards some 1100 years or so and a National Trail was defined which runs close to or alongside Offa’s Dyke and  the Welsh / English border from the Irish Sea Coast at Prestatyn to Chepstow on the Severn Estuary. The Offa’s Dyke Path (OPD) is 177 miles (285 km) long and totals 29,806 feet (9085 m) of height gain despite only reaching a modest 2,306 feet (703 m) at its highest point in the Black Mountains.

My walk covered a four and a half day / ca. 70 mile section of the path from Welshpool (North) to Pandy at the far end of the Hatterrall Ridge (South). I enjoyed the walk in a ‘fast and light’ fashion using a tarp as a lightweight shelter and minimal kit making 15-16 mile days fun rather than a challenge.

Day 1 : Short Cross Near Welshpool to Mellington Hall – 10 miles / 480 m HG

PXL_20230804_103630070

The start of my walk along the ODP

After a long drive from Lancashire I started walking around 1100 and thus this was a shorter day. The start of the day covered more forest paths than is normally to my liking, but after around 45 min I was out into open arable fields walking through maize and enjoying sunshine, beautiful wild flowers and butterflies. I first came across a section of Dyke when I was about an hour into the walk and had its company, on and off, for a good percentage of the day.

This slideshow requires JavaScript.

PXL_20230804_152154928

It was good to be out and in the sunshine and whilst the walk was not stunning it was very pleasant. I knew opportunities to wild camp would be minimal walking through lowland farmland so had booked myself a pitch at the Mellington Hall campsite and enjoyed dinner in the hotel.  It was somewhat surreal to sit in the grandeur of the Hall knowing my night would be spent under a thin sheet of 6,6 Nylon.

Day 2 : Mellington Hall to ‘The Fridd’ just beyond Knighton – 16 mies / 1050 m HG

The day started very wet and I was impressed to be totally dry under my tarp. It’s not easy packing your gear in such a such a confined space however. Soon after I started walking the rain slowed to ‘drizzle’ and did not get heavier that this all day. I had seen the forecast and had expected worse. The rain and low cloud made photographs valueless that day, but I know from past experience that the steep hills of Powys are both very attractive but are also hard work. Back in 2018 I cycled a Welsh Coast to Coast and knew well this would be a hard day.

It is normal to walk the ODP from South to North but I was glad to be walking South that day as I had the wind behind me which meant the rain was not blowing into my face. I was now away from arable farming and into a livestock area.

The day ended well when I found Watson’s Ale House in Knighton. When it came to decent beer this was a veritable oasis in desert of a town. When the landlord found I was a brewer I was soon pulled into conversation and offered a free drink. Helpfully too, he was happy for me to buy a takeaway and bring it back into the bar to eat with my beer.  He had an good selection of well kept cask ales,  I cannot commend the place too highly.

PXL_20230805_181616191

However come 1900 it was time to walk on as my plan was to wild camp on a remote field edge some 1 ½ miles South of the town. I did indeed find a good spot and was amused to be using a length of Offa’s Dyke as necessary shelter from the NW wind.

PXL_20230806_055553555

Day 3 : The Fridd to Gladestry – 17 miles / 860 m HG

Waking to blue skies and sunshine was a tonic, but given my pitch I had to be up and away quickly and I was back on the trail by 0730 and ahead of the morning dog walkers. There was nothing exceptional about the day, but it was a really pleasant walk through rolling hills on wide grassy paths often flanked by bracken, typical for this area.

This slideshow requires JavaScript.

My lunchtime view a significant highlight. I sat on a bench close to a huge beach tree which sheltered me from the one two minute shower of the day.

This slideshow requires JavaScript.

Gladestry was something of a mixed blessing though, as today was a Sunday the pub closed at 5pm meaning no end-of-the-day beer and no dinner! After a proper yomp over Hergest Common (oddly named for a hill which rises to a lofty 423 m) I had a proper thirst on me. On the plus side the walkers campsite at Offa’s Dyke Lodge  turned out to be the perfectly flat back lawn of a B&B run by the most delightful and helpful of couples – Viv & Adrian. I can only imagine that the had you chosen a B&B room that this would have been excellent too. They offered to share their dinner with me! I opted for one of my instant meals as managing my food intolerances can be a challenge but it was a very kind & hospitable offer.

Day 4: Gladestry to Hay on Wye – 10 miles / 750 m HG

Whilst I woke to another fine dry day, I could see from the forecast that day five was due to be very wet and thus mean low cloud over the Black Mountains section. This was the planned highlight of the trip so I opted to stop short at Hay rather than walk onto Hay Bluff for an elevated wild camp. The idea being to sit out the following day in Hay rather than walk though the cloud. Most long distance paths have ‘linking days’ ones which are necessary to get from one attractive area to another and day four was one of those.

This slideshow requires JavaScript.

Day 6 : Hay Bluff-ish to Pandy – 13.5 miles / 550 m HG

Prologue – Much of day five was spent reading my book whilst drinking some excellent Earl Grey in The Granary Cafe in Hay. Whilst overpriced for food, the tea, food and service were all very good. By mid afternoon my tea tank was overflowing and I was keen for a change so I set off to walk the 2 ½ miles to the foot of Hay Bluff. I found a sheltered gulley close to, yet hidden from, the road and out of sight of the farms too.  Wonderfully, when the cloud cleared my hidden pitch had a great view of the tops of Hay Bluff and Twmpa. Before long the rain stopped and finally the sun came out.

This slideshow requires JavaScript.

Day six started warm, dry and full of promise. Almost all the height gain of the day was complete within the first 45 minutes as I found myself atop the Hatterrall Ridge. I had been wise to camp lower down as the top was very soft, often boggy with the path only being good because it had been improved or ‘paved’ with stone slabs. As soon as I reached the ridge I was infused with joy and felt the serenity of being high on a hill. I cannot readily put the feeling into words, the nearest I can phrase it is to say that it felt like finding my purpose and true home. I enjoyed the views down into two countries and was reminded of twice cycling (2013 & 2018) along the Llanthony Valley and up Gospel Pass.

This slideshow requires JavaScript.

After I enjoyed passing my fourth trig point of the day it was time to drop down and into Pandy. This settlement is what my grandmother would have described as a ‘one eyed hole’. Once it had three pubs and a campsite, now all have closed. I’d shaken the internet the day before and found there was a campsite in neighbouring Llanvihangel Crucorney, a place worth visiting for the name alone! I don’t think I’ve ever walked away from a campsite before, knowing that hunting out a hedgerow would be a better option. I did that day. The camping field was directly adjacent to the A465 and there was not a level area of grass within it. All was not lost however as something Google had omitted to find was the village pub. In terms of food it was middle of the road, but in terms of friendliness and service it was second to none. Yes, I could camp in the beer garden and would I like a pint? Thank you and yes! I was further delighted to find that my bus stopped directly opposite so at 0800 the following morning I headed off to rendezvous with Mrs W in Newport.

Conclusions

This section of the ODP is the most dramatic of the whole route. I really enjoyed the Hatterrall Ridge, but the rest I’d describe as merely pleasant. Was this probably points to is how spoilt I have been with the long distance walks I have done in the past two years. Walking next to lengths of the Earthen Dyke was fun and the signage was almost faultless. If you want a pleasant few days walking in verdant countryside this could be the walk for you. I’d hesitate to call it a walk for beginners because the mid-Wales stretch involves long days between points of fixed accommodation with a generous amount of height gain thrown in. Walking ‘fast and light’ was certainly the best approach for this section.

The South West Coast Path – Retrospective – PART TWO – South Devon

Introduction

This article is the second part of a short series on the South West Coast Path (SWCP) which aims to give an overview of this spectacular long distance walk, county-by county. For an overview, history and statistics of the whole route head over to my first post. The same link will take you to my section about Dorset. The structure of these articles starts with an overview of the geology and how this links to the terrain. Then to add a human side to the story I will pepper the text with anecdotes of my time walking the SWCP from 1986 to 1991.

South Devon

The underlying geology of South Devon is dominated by Sandstone and Slate. As with much of the rest of the SWCP this means the path is mostly free draining and free of significant amounts of mud. However the South East corner is uniquely composed of Greensand and Gault. This later material is very prone to landslips and has given rise to a very unusual feature of the SWCP just West of Lyme Regis. This 8 km section is known as the ‘Landslips’ or ‘Undercliff’ was mostly formed in the late 18th and early 19th century and has led to a unique environment for trees, plant life and birds. Unlike the rest of the SWCP it is densely wooded and almost rainforest like in character. It should be noted that this section has to be completed within one day as the only entrance and exit points are at the either end and there is nowhere suitable even for wild-camping.

undercliff devon better

I remember that when I walked this section with my friend Matt, fairly soon after exiting we walked inland to a farm and asked to camp. They agreed and even gave us some unpasteurised milk in the morning for our breakfast; different times. The next section sees the reasonably high cliffs of around 150 m gradually decrease as you get closer to Exmouth. This is an unusually level part of the path. Once you have crossed the River Ex you get to walk alongside some of the most dramatic railway line in the UK which rushes along right next to the sea. So close in fact that a section washed away in 2014 and had to underpinned and rebuilt.

Dawlish Railway Line - with train

Teignmouth, Torquay, Torbay and Brixham are very built up and we caught a bus around these areas since it was all urban tarmac walking. Restarting from Brixham you are into a region with some reasonably wide river mouths which necessitate ferry crossings. It is not possible to time all of these perfectly to match your plans, so expect some waiting around. There are a number of lovely promontories too – Start Point, Prawn Point, Bolt Head, Bolt Tail which can be very windy spots but are gorgeous.

I recall that approaching Gammon Head, we headed into East Prawle for lunch to get shelter from the rain. The fantastically names Pigs Nose pub had a roaring fire next to which we dried out jackets and socks. Further along at the River Erme you find a crossing you can wade across at low tide which is fun. We took paper tide timetables, these days you’ll be able to download them!  Soon after this you reach Plymouth and the River Tamar which forms the border to Cornwall.

RIver Erme crossing

The next article in this series will cover South Cornwall which surpasses even Dorset in my heart (coming soon…).

<< To Dorset. to South Cornwall >>

Unfinished business – An exceptional four day wild-walk in the NE Cairngorms.

Very occasionally all the factors which facilitate a great multi-day walk all coincide; availability, fitness, weather, time of year and location. That is exactly what happened with my 2023 trip to the Cairngorms and truly an answer to prayer after having to miss out a section of my big seven day wild-walk last April. This four day tour of the NE Cairngorms has to rank as the best multi-day walk I’ve done in ten years and my best wild-walk ever. The walk totalled 52 miles over four days at the end of May 2023.

Caingorms Route - 2023

Day 1 – Linn of Quoich Car Park to Ben Avon : 11.5 miles / 1020 m

pxl_20230528_081641879
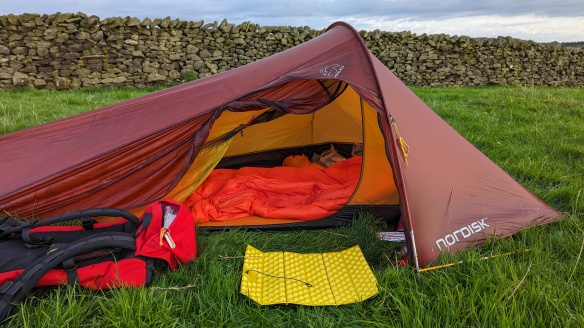
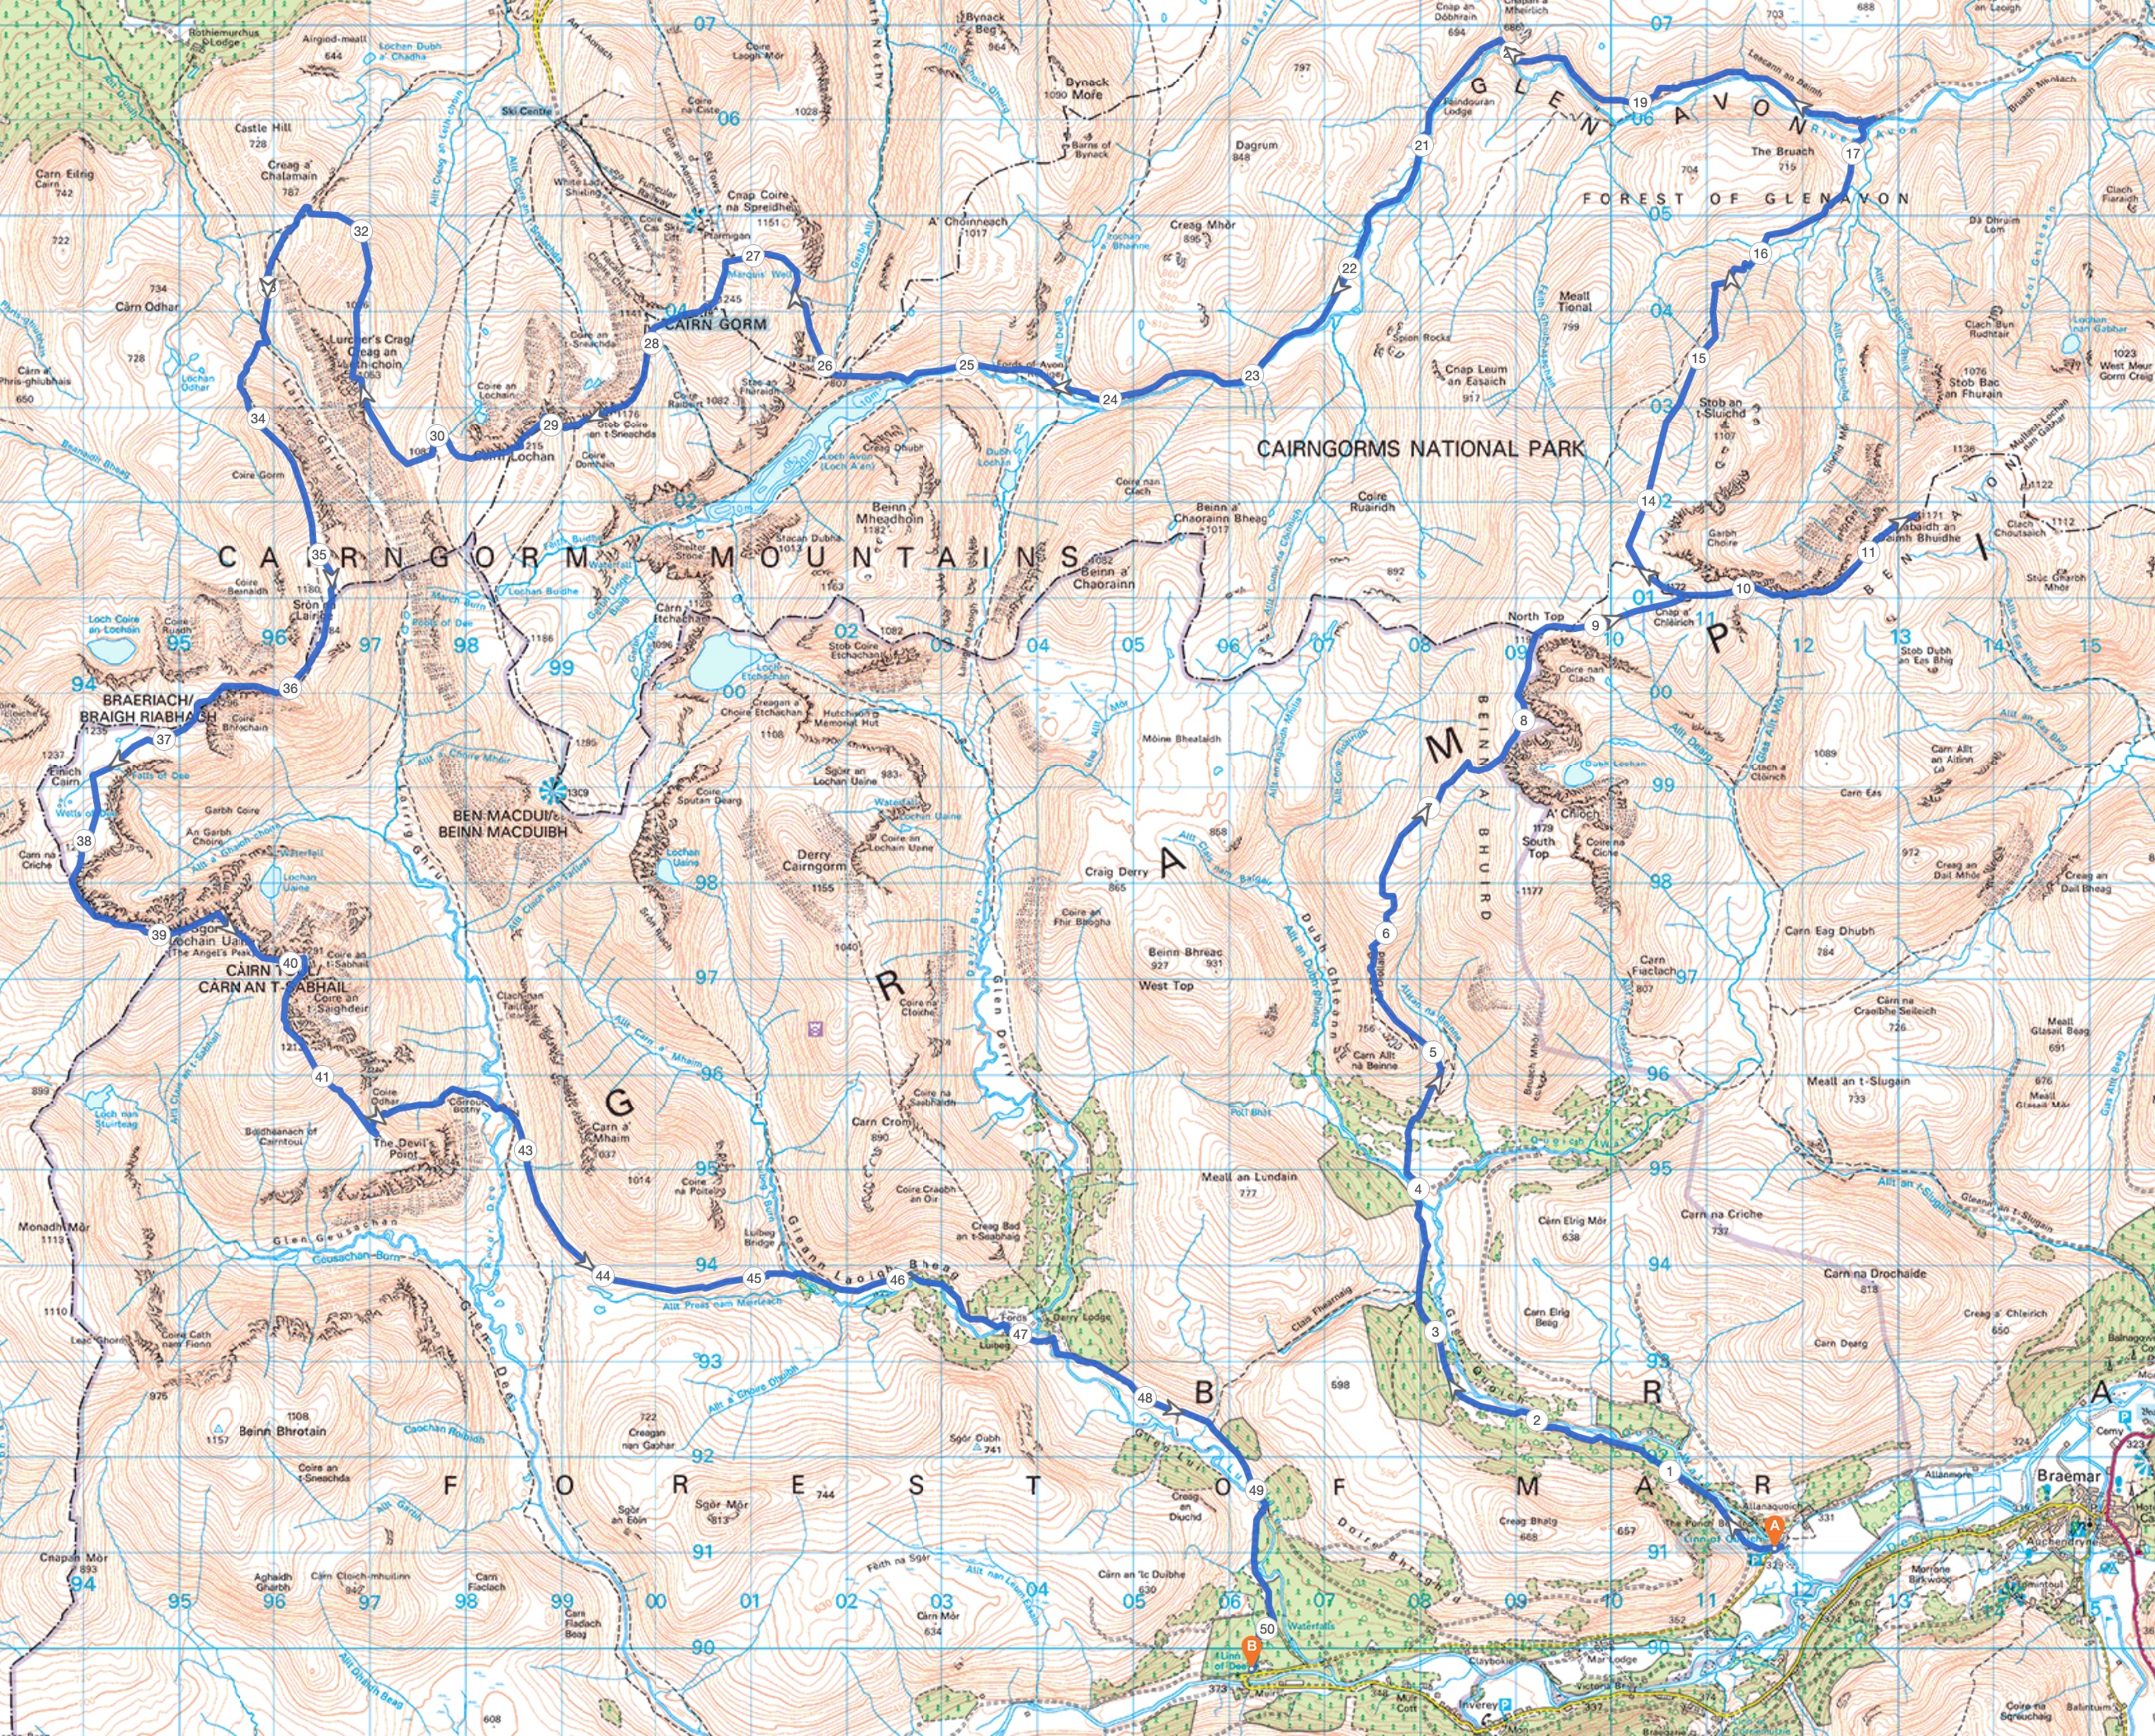
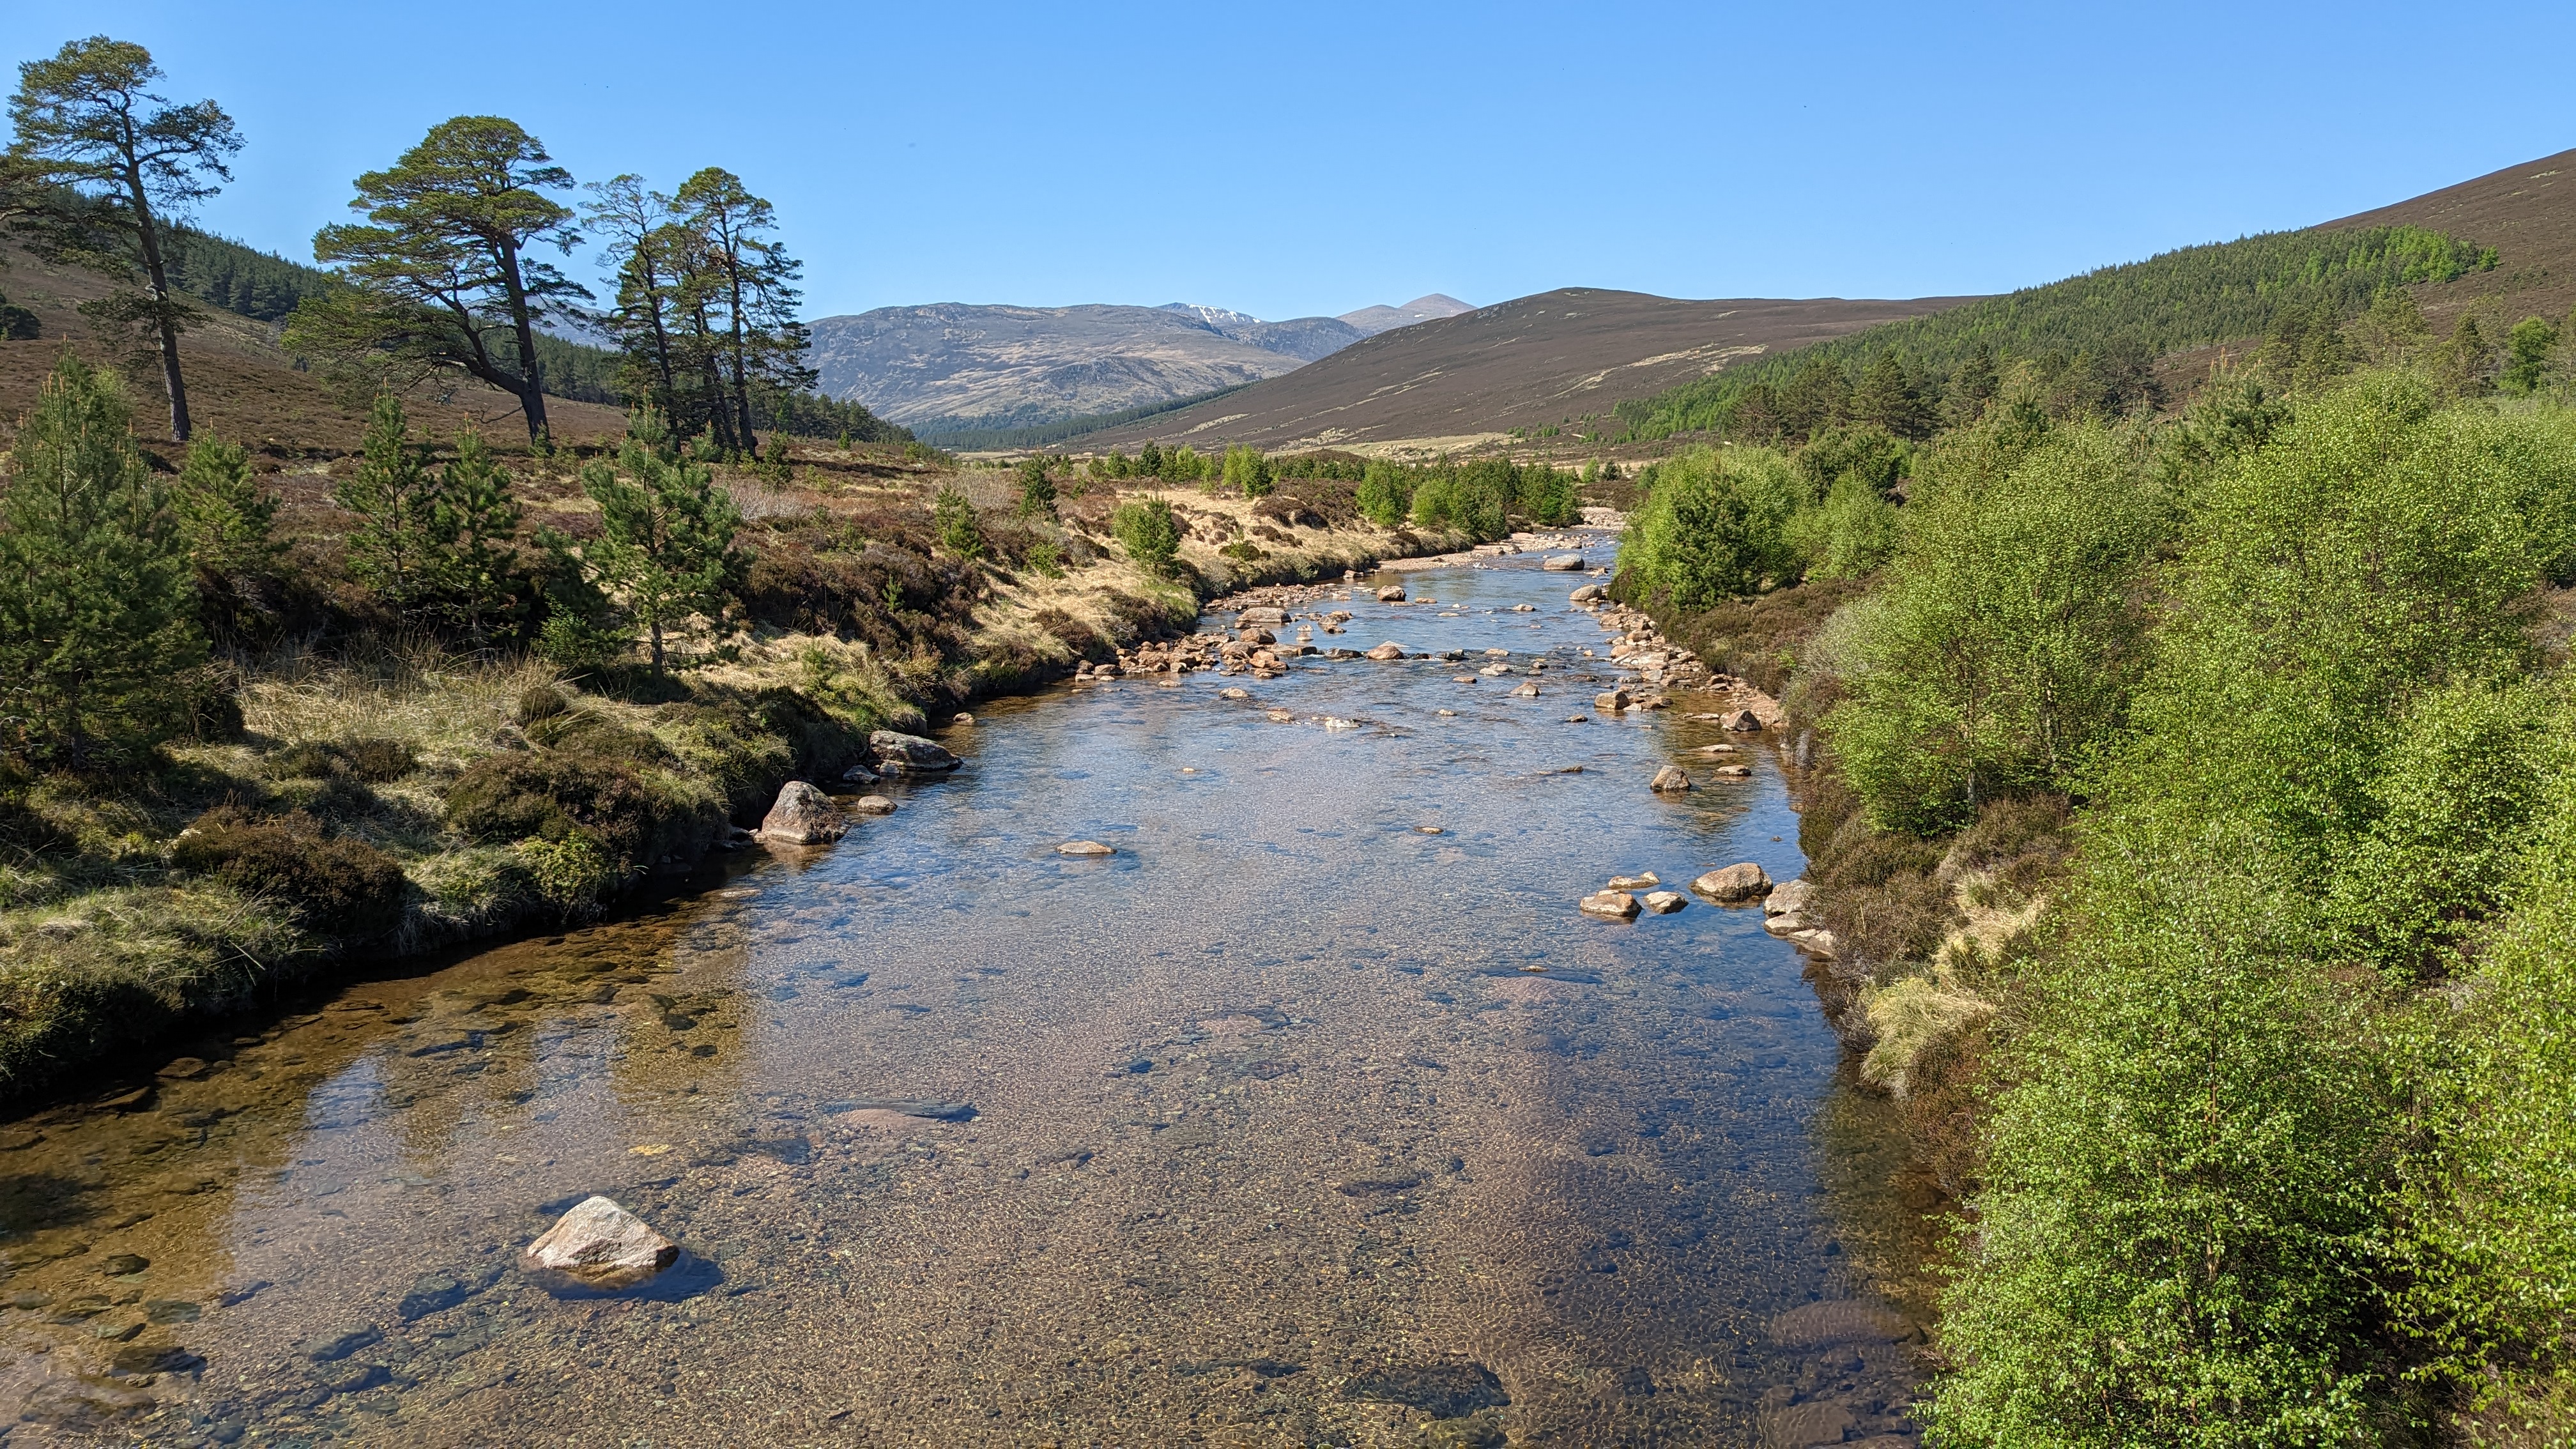
It is a long walk in to Ben Avon, and many people opt to cycle the shooters track to the base of the climb to cut 8 miles off of the total. Whilst not as appealing as Glen Lui, with it’s photogenic Scots Pines, it was an reasonably attractive walk in made more so by knowing that I would not be re-tracing my steps. My route first took me up Beinn A’ Bhuird (the first of six Munro’s and at least as many tops of this trip).

Whilst the summit is apparently featureless, the beauty of patches of delicate alpines which graced my lunch spot were simply delightful. As is typical in this area, whilst the hills are mostly flat topped, the cliffs and Cories are spectacular, especially when patches of snow add further contrast.


This slideshow requires JavaScript.


The descent to the Bealach between Beinn A’ Bhuird and Ben Avon was sketchy due to the fine loose surface on the steeper sections which I was negotiating with a full multi-day pack. The re-ascent was a lot easier. One of the significant attractions of Ben Avon is the granite tor which forms the summit, a feature more often associated with Dartmoor. On the morning of starting my walk I had to decide which tent to take with me, my plan was to use my four season Soulo if the wind looked to be strong or my lighter Enan if the conditions looked more gentle. The later being 1.2 kg / 50% lighter. The nature of the ground on my approach to the tor had me doubting my decision to bring the Enan as it looked like ground which would not take pegs and a freestanding design would be essential. However, my preparatory research had suggested that the far side (NE) of the tor would be my most likely camping area, so I held onto hope.

Whilst much of the far side of the tor was strewn with rounded boulders there was also a sizeable area blanketed with moss which on investigation I found to be atop fine rounded gravel. Whilst I needed to double peg the main guys I managed a secure and very comfortable pitch.

pxl_20230528_150209986

pxl_20230528_151133354
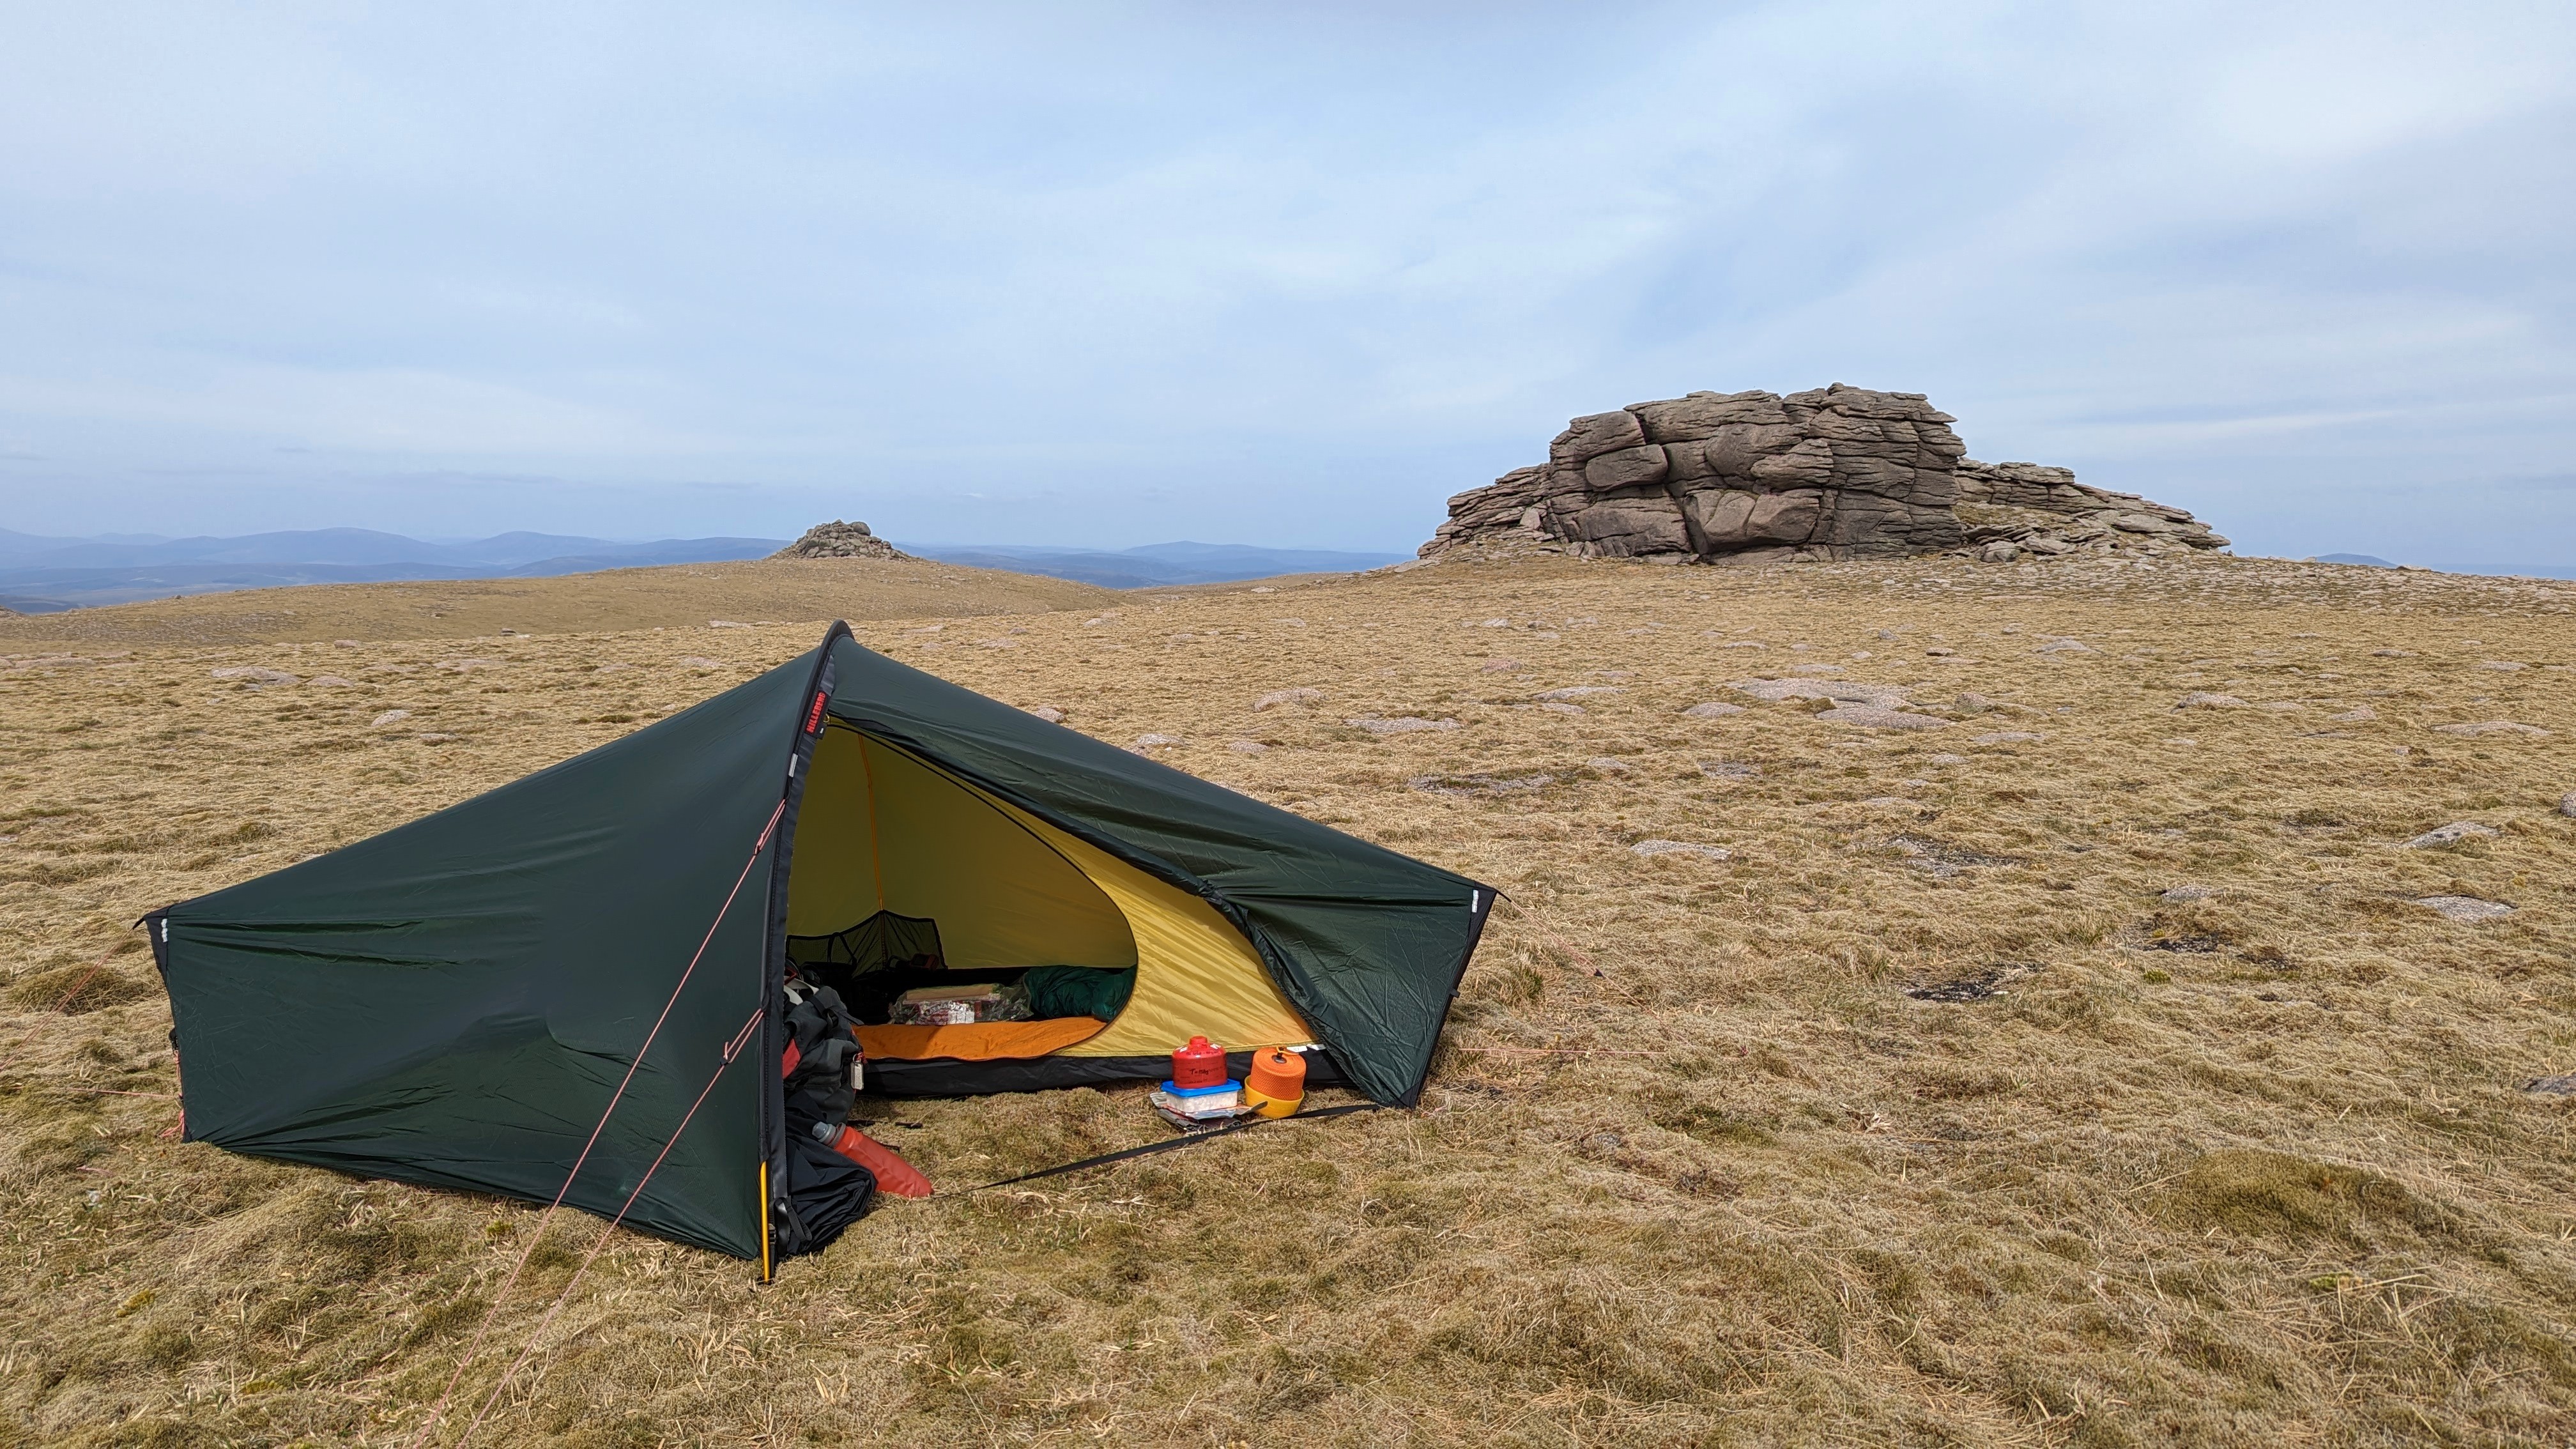
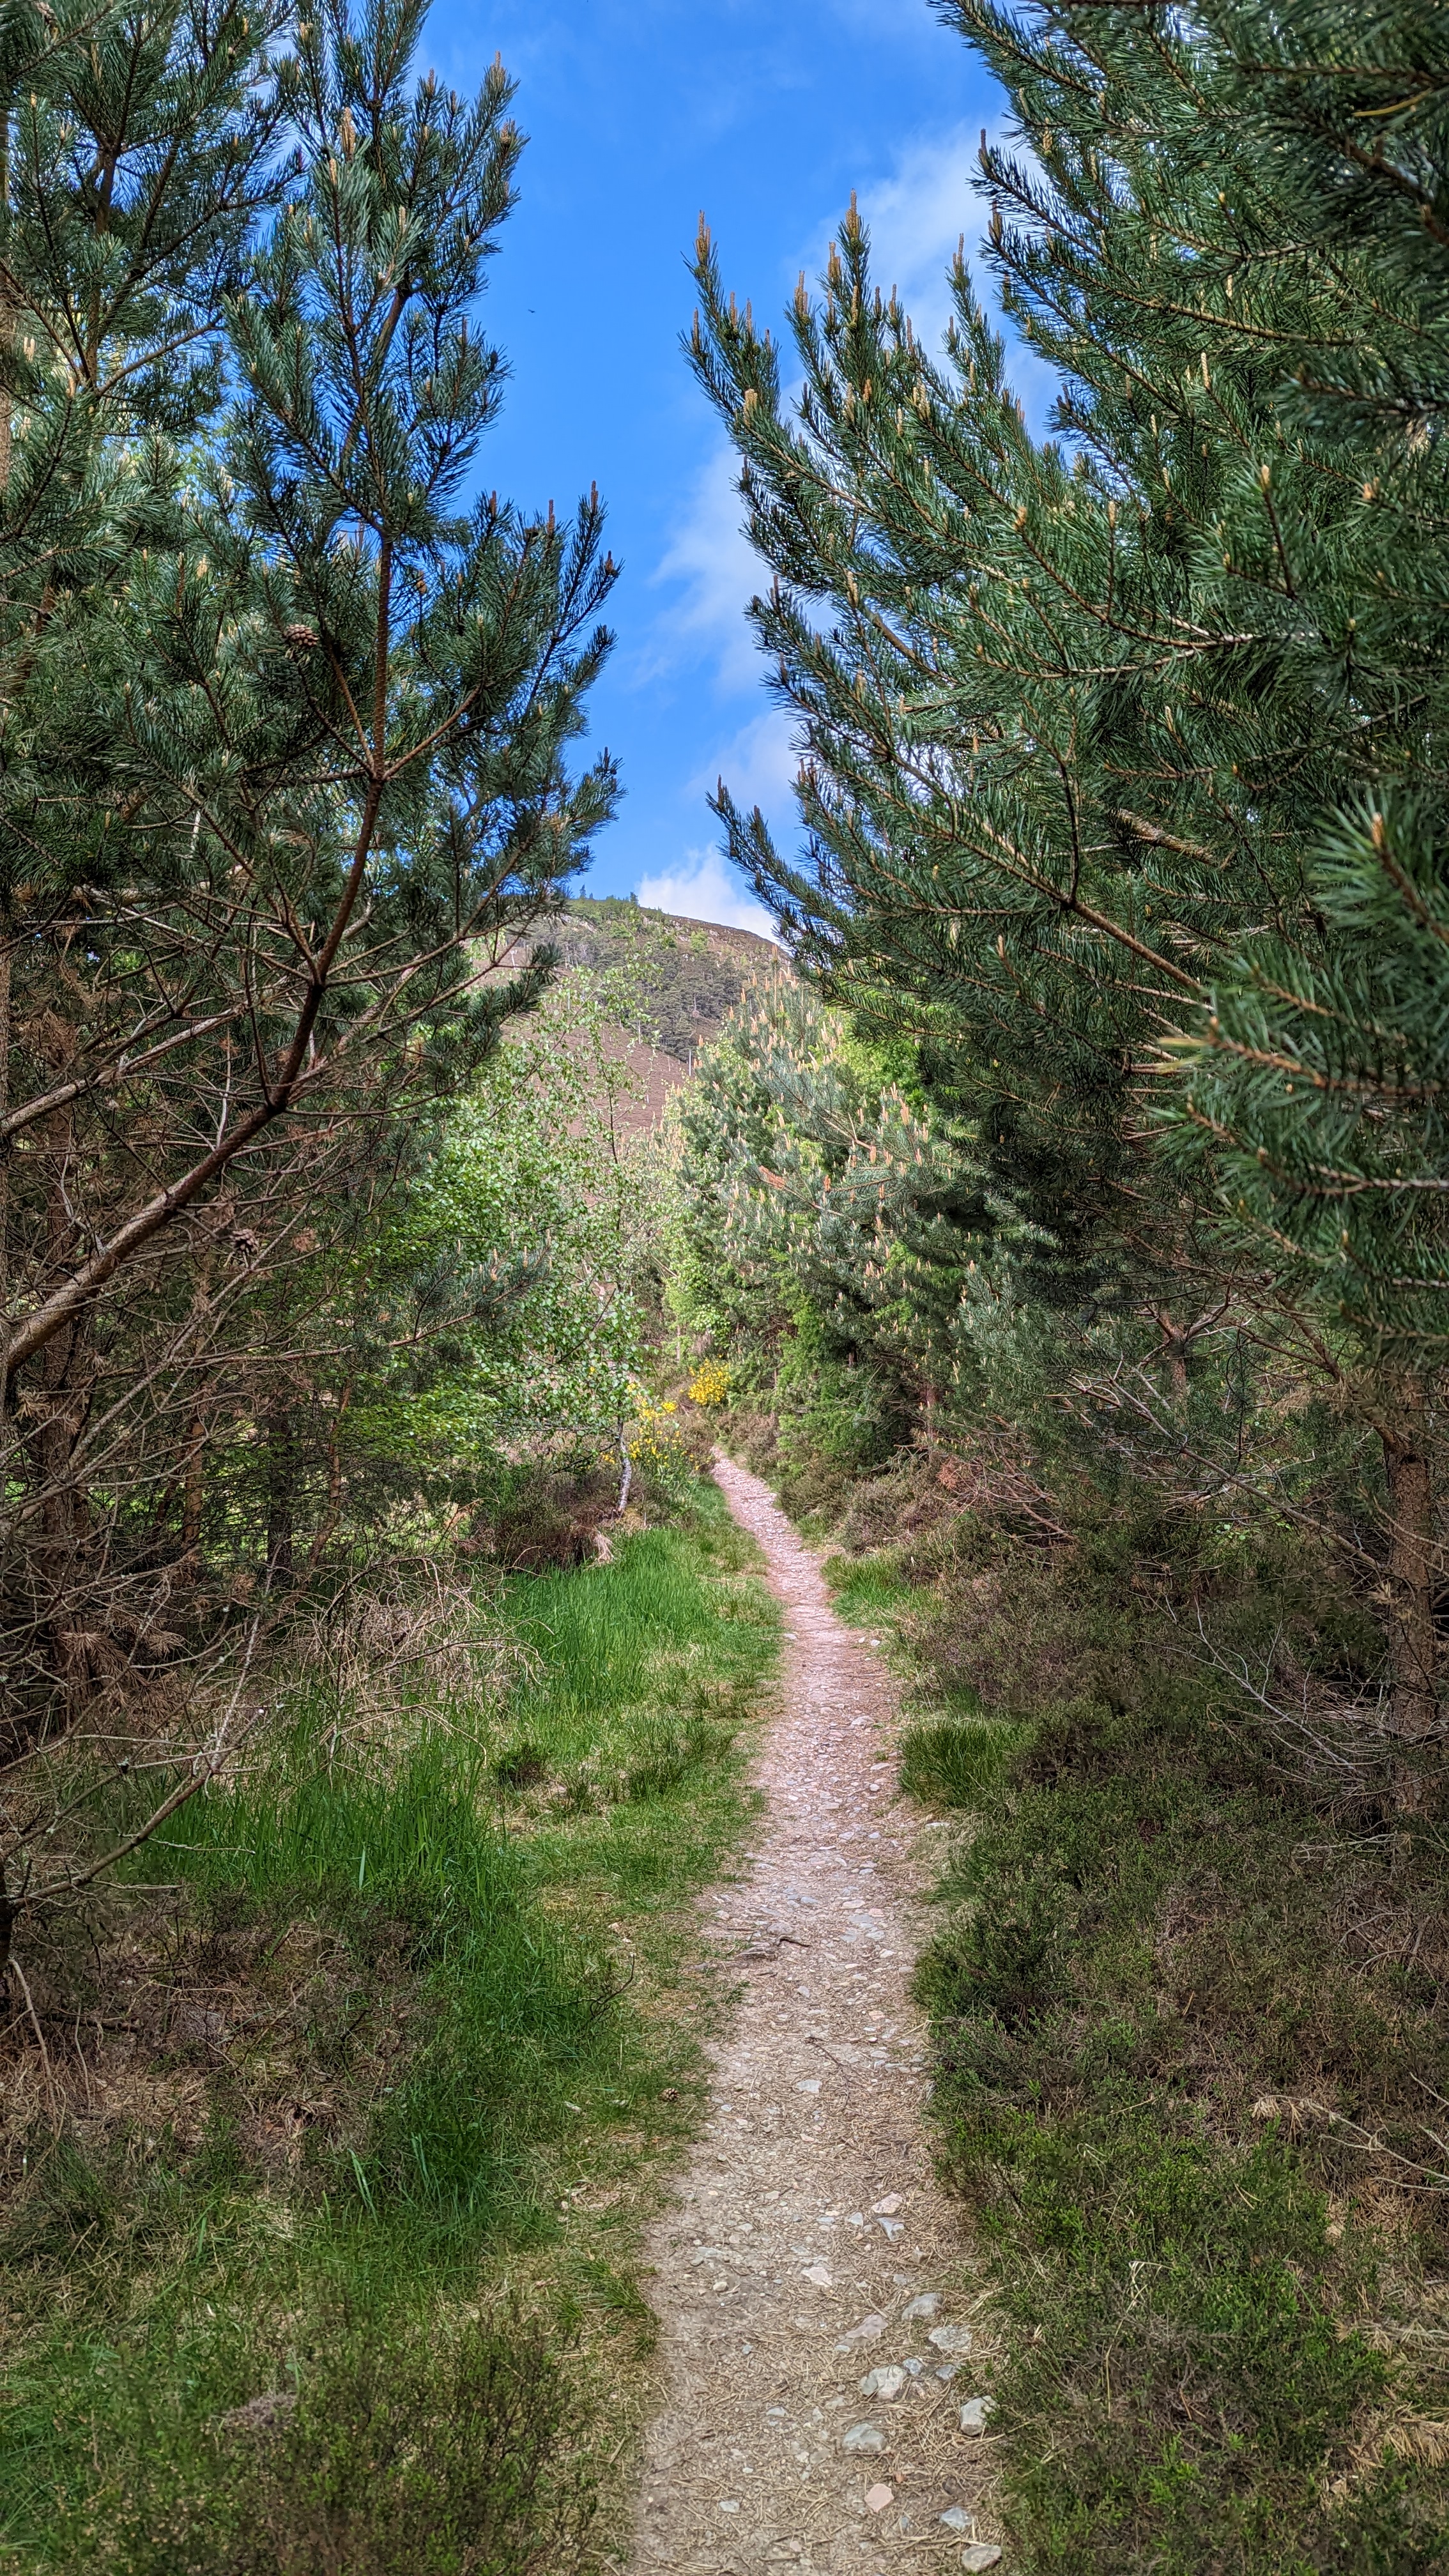
Once set up for the evening I enjoyed climbing the tor itself.

Day 2 – Ben Avon Summit to Loch Avon – 14.5 miles / 240 m

This was to be a longer day in terms of distance, but one which was mostly downhill and it started with a beautiful clear sky and the lightest of winds. After retracing my steps back across the Bealach it was time to head off piste on a pathless route down to Glen Avon passing beside the rocky outcrops of Stob an t’Sluichd. Whilst the descent was slow, the poor soil meant than none of the heather was deep so it wasn’t hard to find a sensible route across the ground. About ¾ of the way down I hit the path shown on the OS Map and headed to the suspension bring across the River Avon.

PXL_20230529_104153209

Much of the rest of Day 2 / the lower reaches of Glen Avon were an uninspiring but necessary yomp to get me to the head of Glen Avon ready for the next day. The highlights of the day were waiting for the final 30 min of the day. The first being the Fords of Avon Refuge.

PXL_20230529_144125613

After this the Glen narrowed in and held its magic in suspense round a bend in the river like a slowly revealed plot twist in a well written novel. The view up Loch A’an (Avon) made the afternoon’s route march wholly worthwhile. Truly the most stunning wild camping spot I have ever experienced in over 30 years of backpacking! Arriving at the Loch I was initially disappointed to see a group of five lads with big packs, but they were just having a break and when they moved on I had the Loch to myself all evening. Such a beautiful place, which included my own private beach allowing me to cool and wash my feet whilst drinking in the majestic splendour of the location.

This slideshow requires JavaScript.

To sit and eat your dinner / breakfast with views of Cairngorm, Ben Macdui, Carn Etchachan and the Shelter Stone across the clear waters of the loch was simply sublime.

PXL_20230530_054830085

Day 3 – Loch Avon to the Wells of Dee – 12.1 miles / 1380 m

This was going to be my biggest day and I was unsure if the higher streams on upper slopes on either side of Cairngorm would still be running so I started my first big climb of the day with two litres of water to last me until I reached the Lairig Ghru around 3pm. Actually there was still plenty of snow melt feeding both the stream just above The Saddle and that draining into Lochan below Cairn Lochan. The story of this day is better told in pictures than words

This slideshow requires JavaScript.

Rugged equipment, suitable for all weathers!
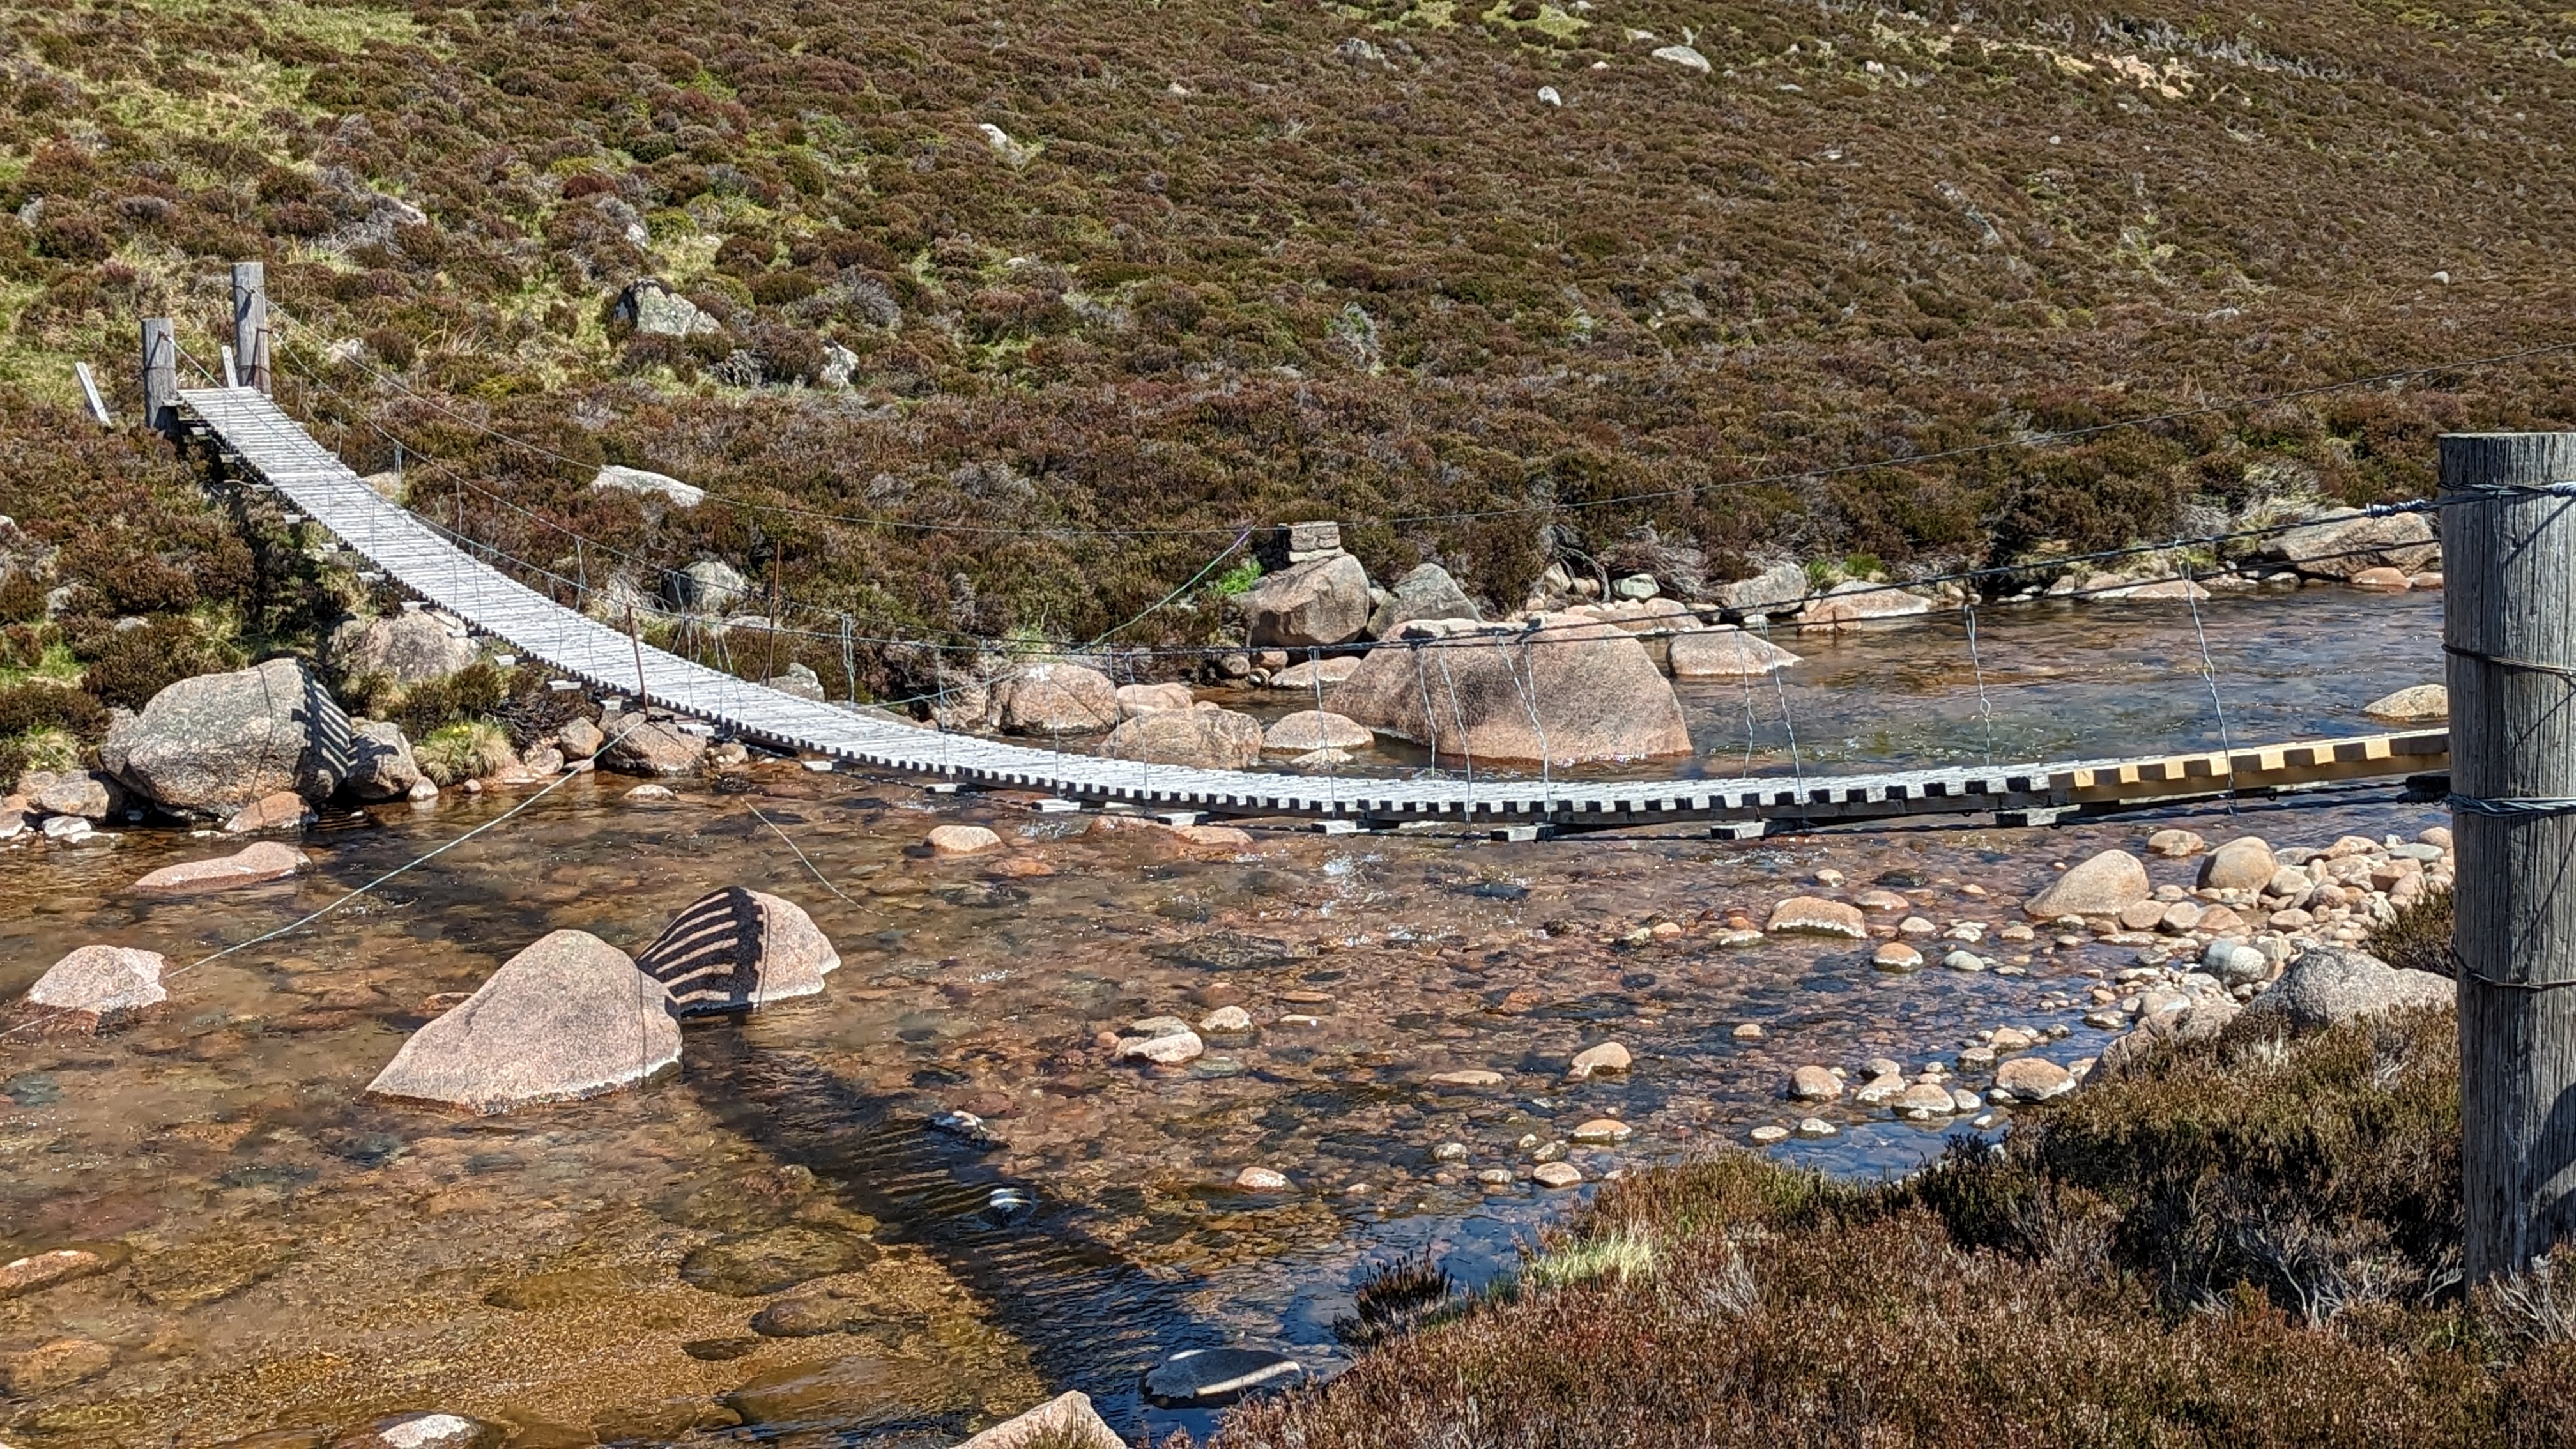
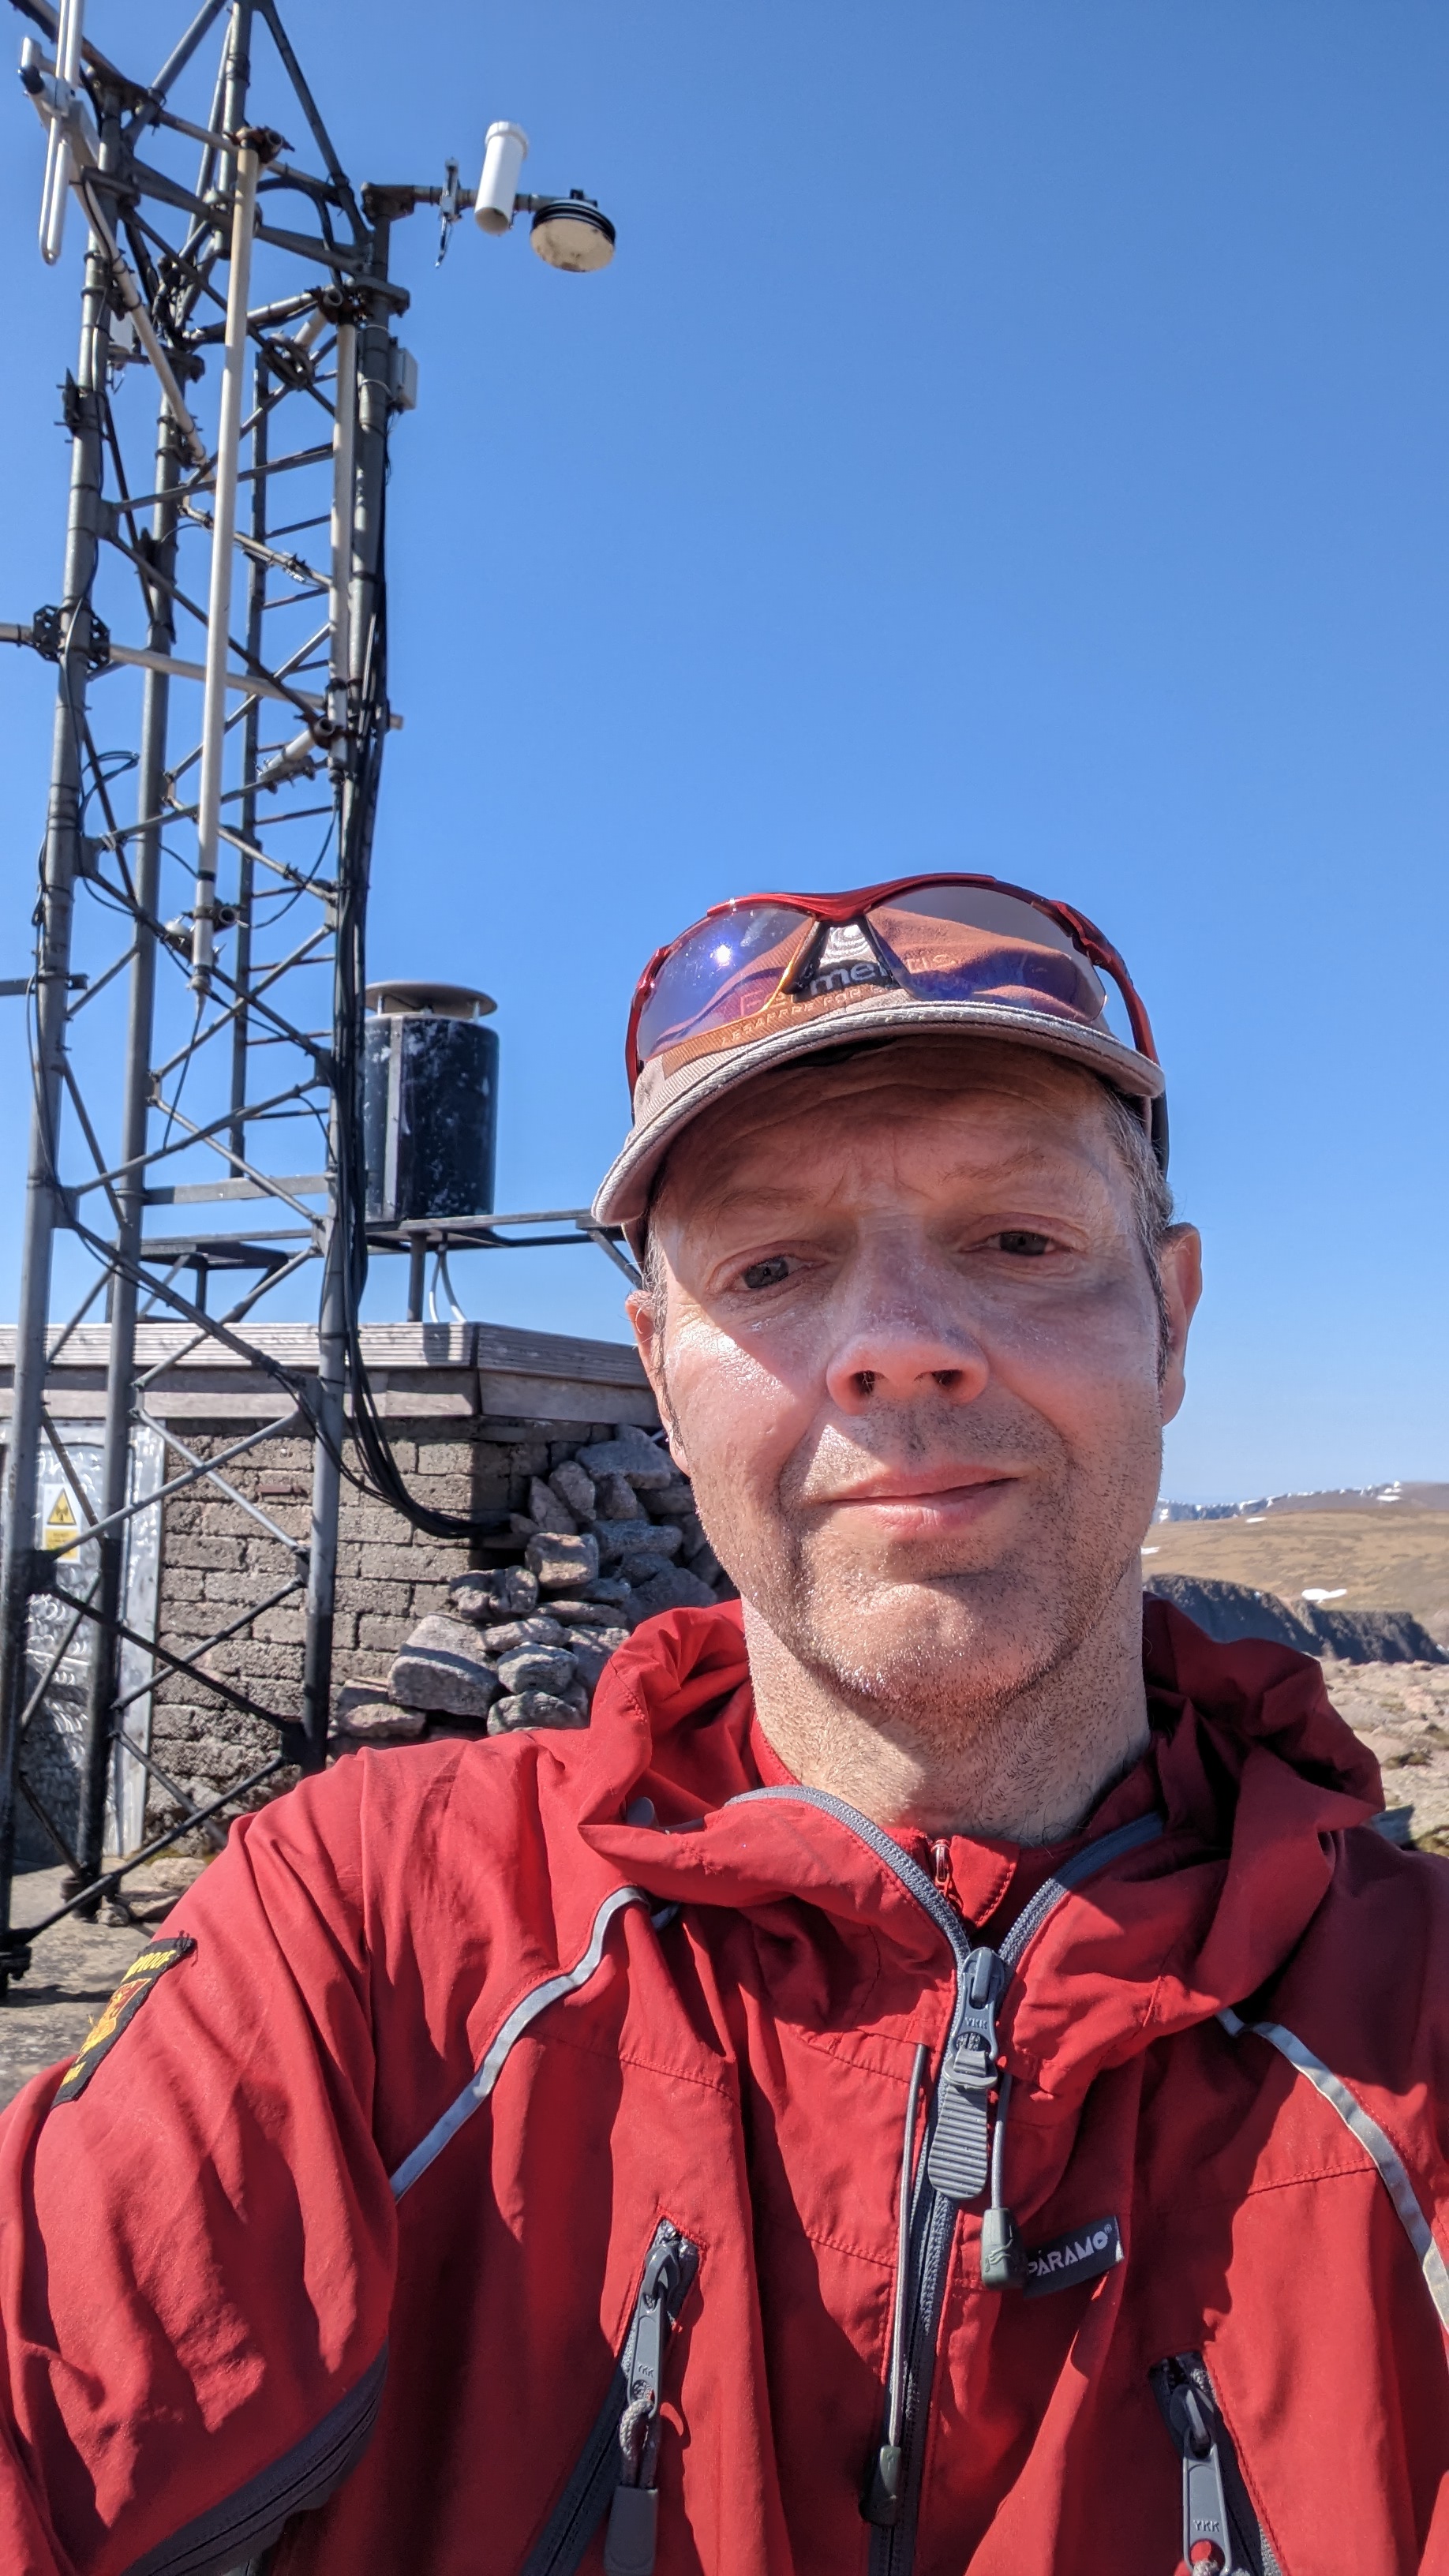
This was my first ascent of Cairngorm so I enjoyed seeing the famous weather station on the summit.  My route then took me along the edge of a spectacular series of corries and buttresses until it was time to drop down to the Chalamain Gap and further into the Lairig Ghru. It was now the hottest period of the day as I started my ascent of Braeriach which afforded the views I had hoped for, yet missed out on, last year. The final push around Coire Bhrochain to the summit was hard, it being the culmination of a total of nearly 1400 m that day with full kit.


The springs to the North of the Falls of Dee were otherworldly but not a suitable place to stop.

PXL_20230530_164939328

The banks of the larger stream from the West (fed by the Wells of Dee), however, were an excellent spot. Sadly it was not possible to pitch close enough to the edge of the cliffs to get the amazing view from the tent itself but finding myself at 4000’ and it too warm to sit in the tent to cook was a very pleasantly surreal experience. Walking over to see the Falls of Dee only to find them hidden under a snow bridge simply added to the bizarre nature of the place.

What an amazing day!

PXL_20230530_162610974

Day 4 – Wells of Dee to Linn of Dee – 13.4 miles / 300 m

I awoke to yet another fine warm day and was on the move by 0730. I was expecting the descent back into the Lairig Ghru to be slow. After revelling in the views from the top of The Angels Peak it was tackling the boulder fields around the summit of Cairn Toul (1291 m) which proved the slow point of the day. Whilst no climbing is involved, picking a route through these boulder fields makes Cairn Toul feel like a hard-won summit.

This slideshow requires JavaScript.

The sense of satisfaction of claiming my sixth Munro of the trip, three of which being above 4000’ was considerable. Now it was time to tackle the descent of the boulder field, across one more top and drop down into the Bealach at the foot of The Devil’s Point. The fine rounded gravel, typical of the Cairngorms and erosion of the path made the initial descent, following the burn, to the Corrour Bothy tricky with 11 kg on my back. However after only around 50 m the path became less steep and more secure so I could enjoy walking alongside a series of waterfalls down to the bothy.

This slideshow requires JavaScript.

Now I was on the walk out, but as I remembered from last year the trees of Glen Lui and Gleann Laoigh Bheag were a delight and offered welcome shade. My erroneous route plan suggested the day was to be 16 miles, so I ate lunch on the hoof and was surprised how quickly I reached Derry Lodge. It was a welcome surprise to realise that I only had three miles of pleasant flat walking to finish my adventure in the Cairngorms.

PXL_20230531_134811237

I enjoyed a second lunch at the Linn of Dee whilst cooling off my feet in the river.

Linn-of-Dee-1

Epilogue

I have been multi-day walking for over 30 years and wild walking since 2017 and these four days proved an unchallenged apex of all my walking experiences in the UK. The ability and opportunity to climb several peaks over 3000’ and three over 4000’ whilst having all I needed for a comfortable unsupported 52 mile trek was an amazing blessing. The views, made accessible by the weather, the solitude, the warm evenings to relax, read and enjoy my evening meal with world-class views from highly elevated camping pitches were all prodigious aspects to an exceptional four day walk.

PXL_20230531_080954481

PXL_20230527_184306179
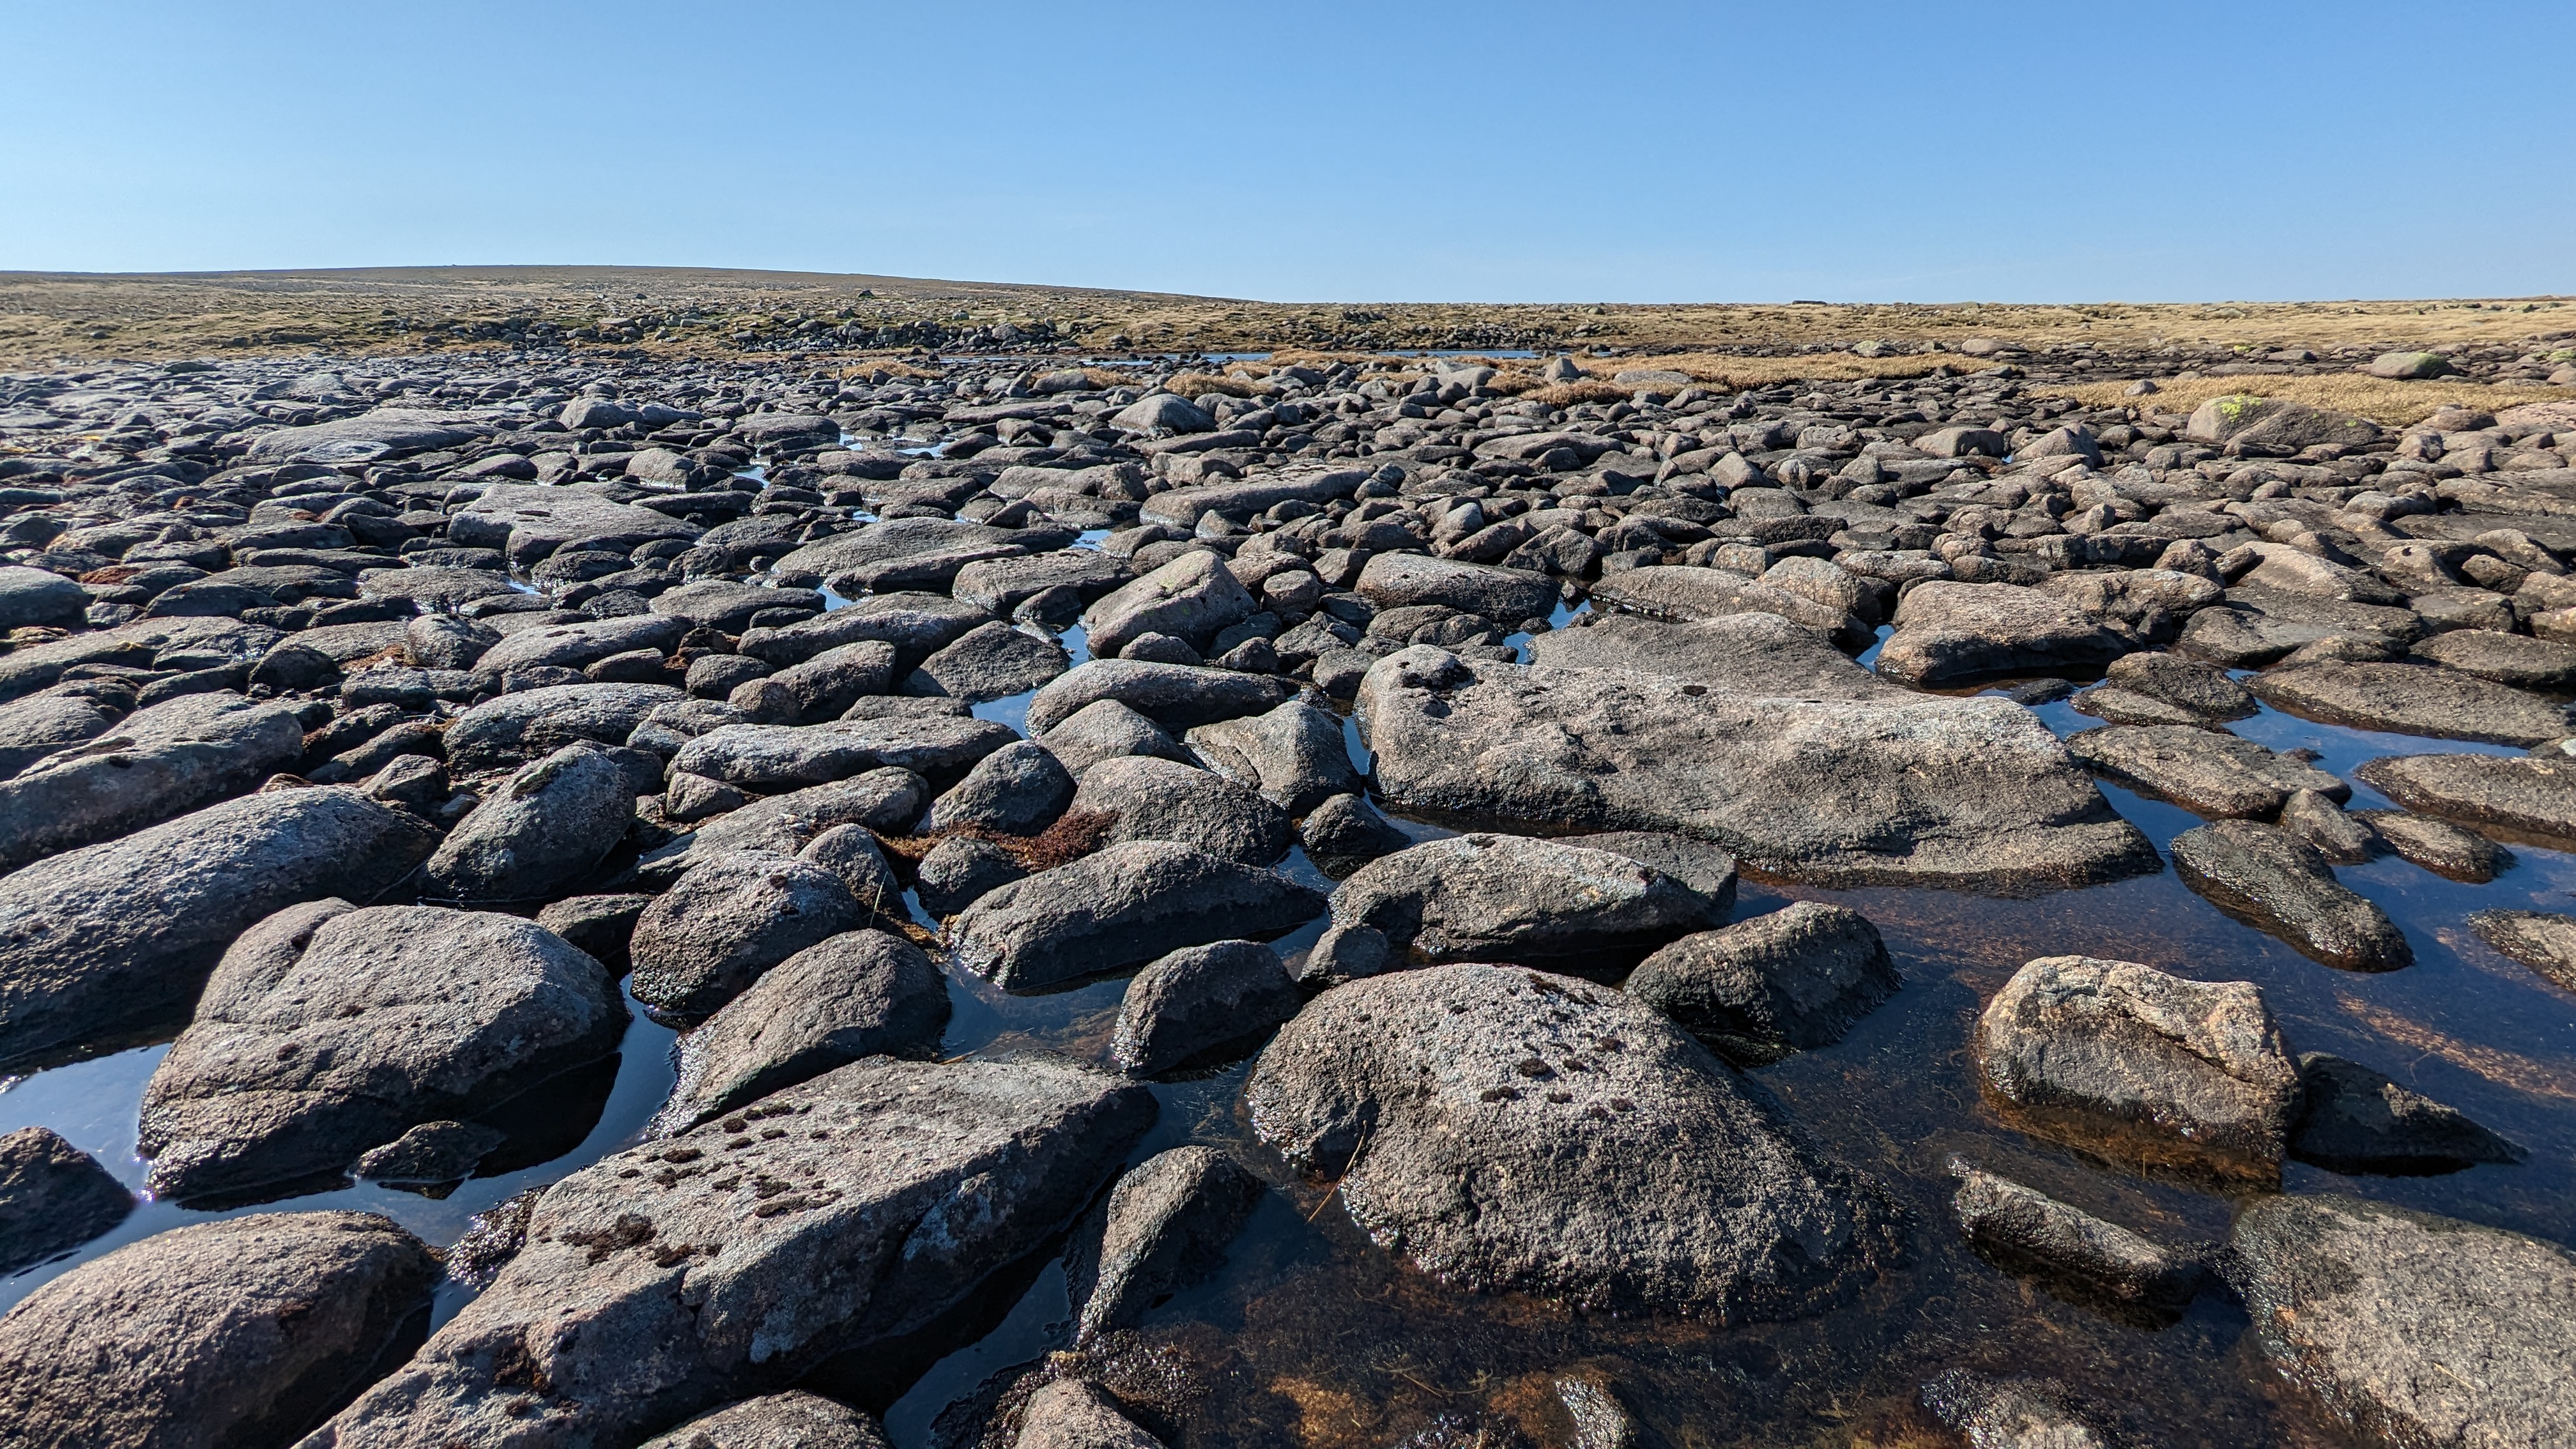
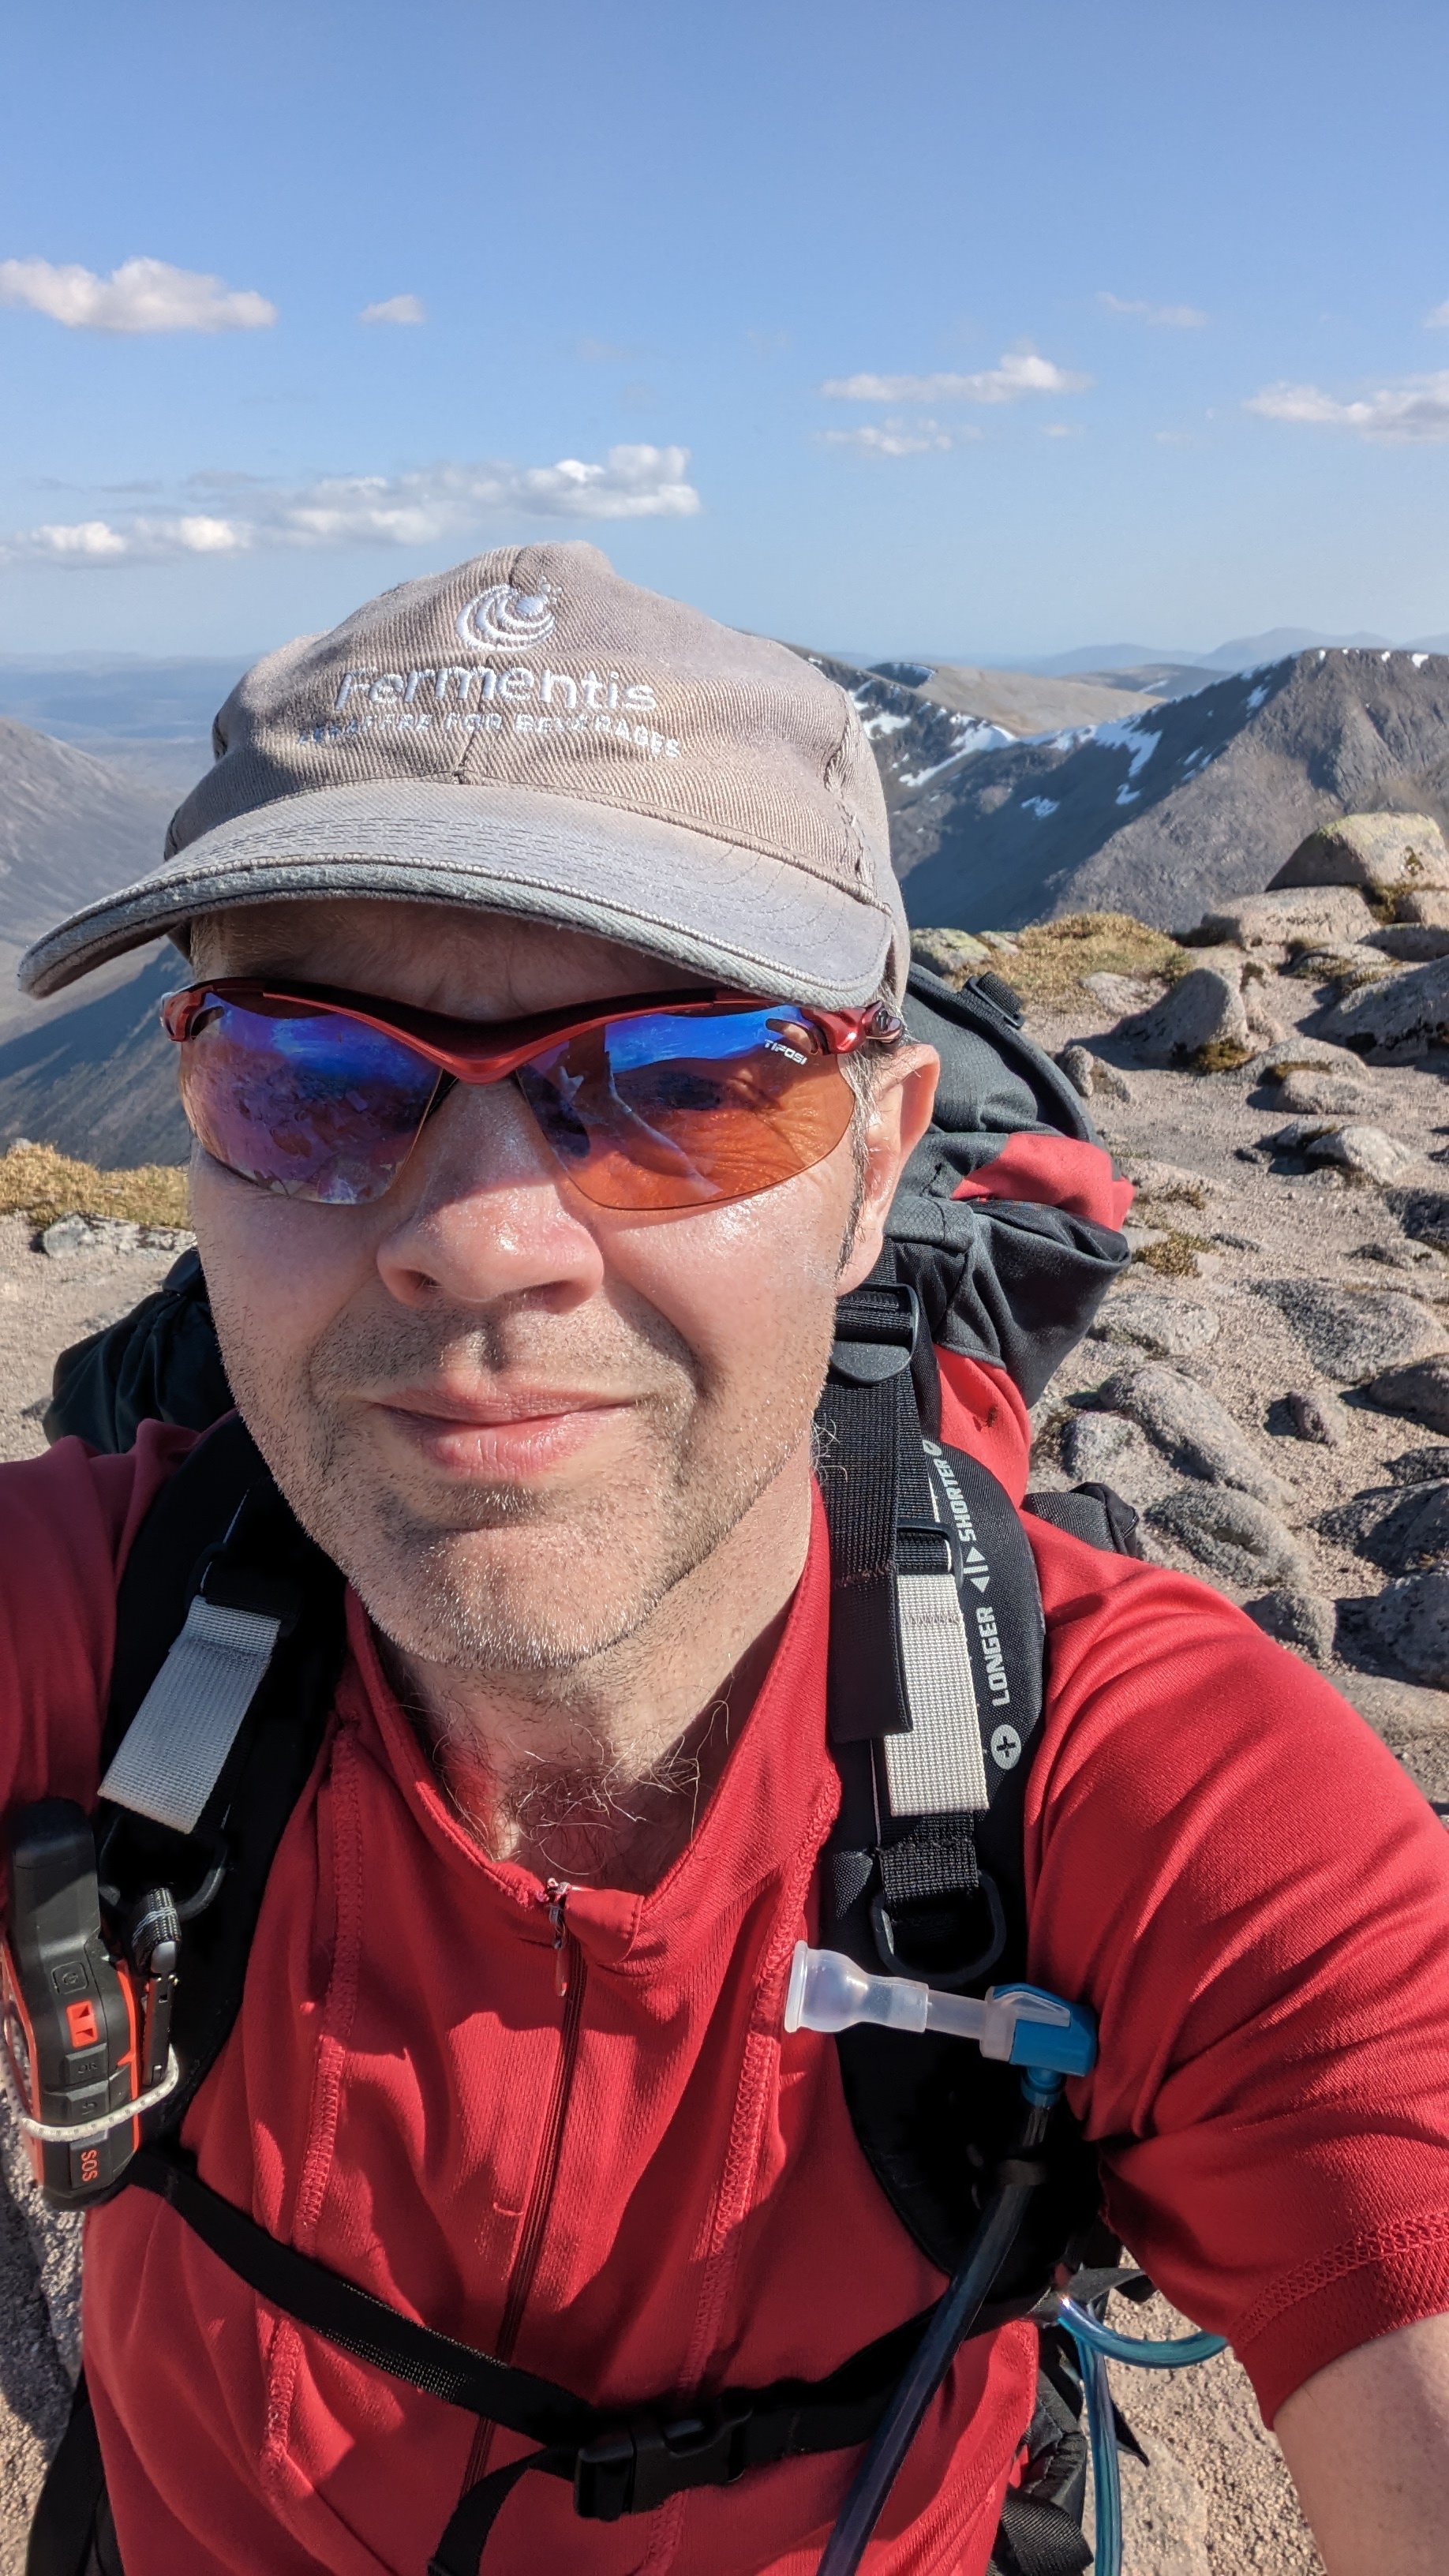
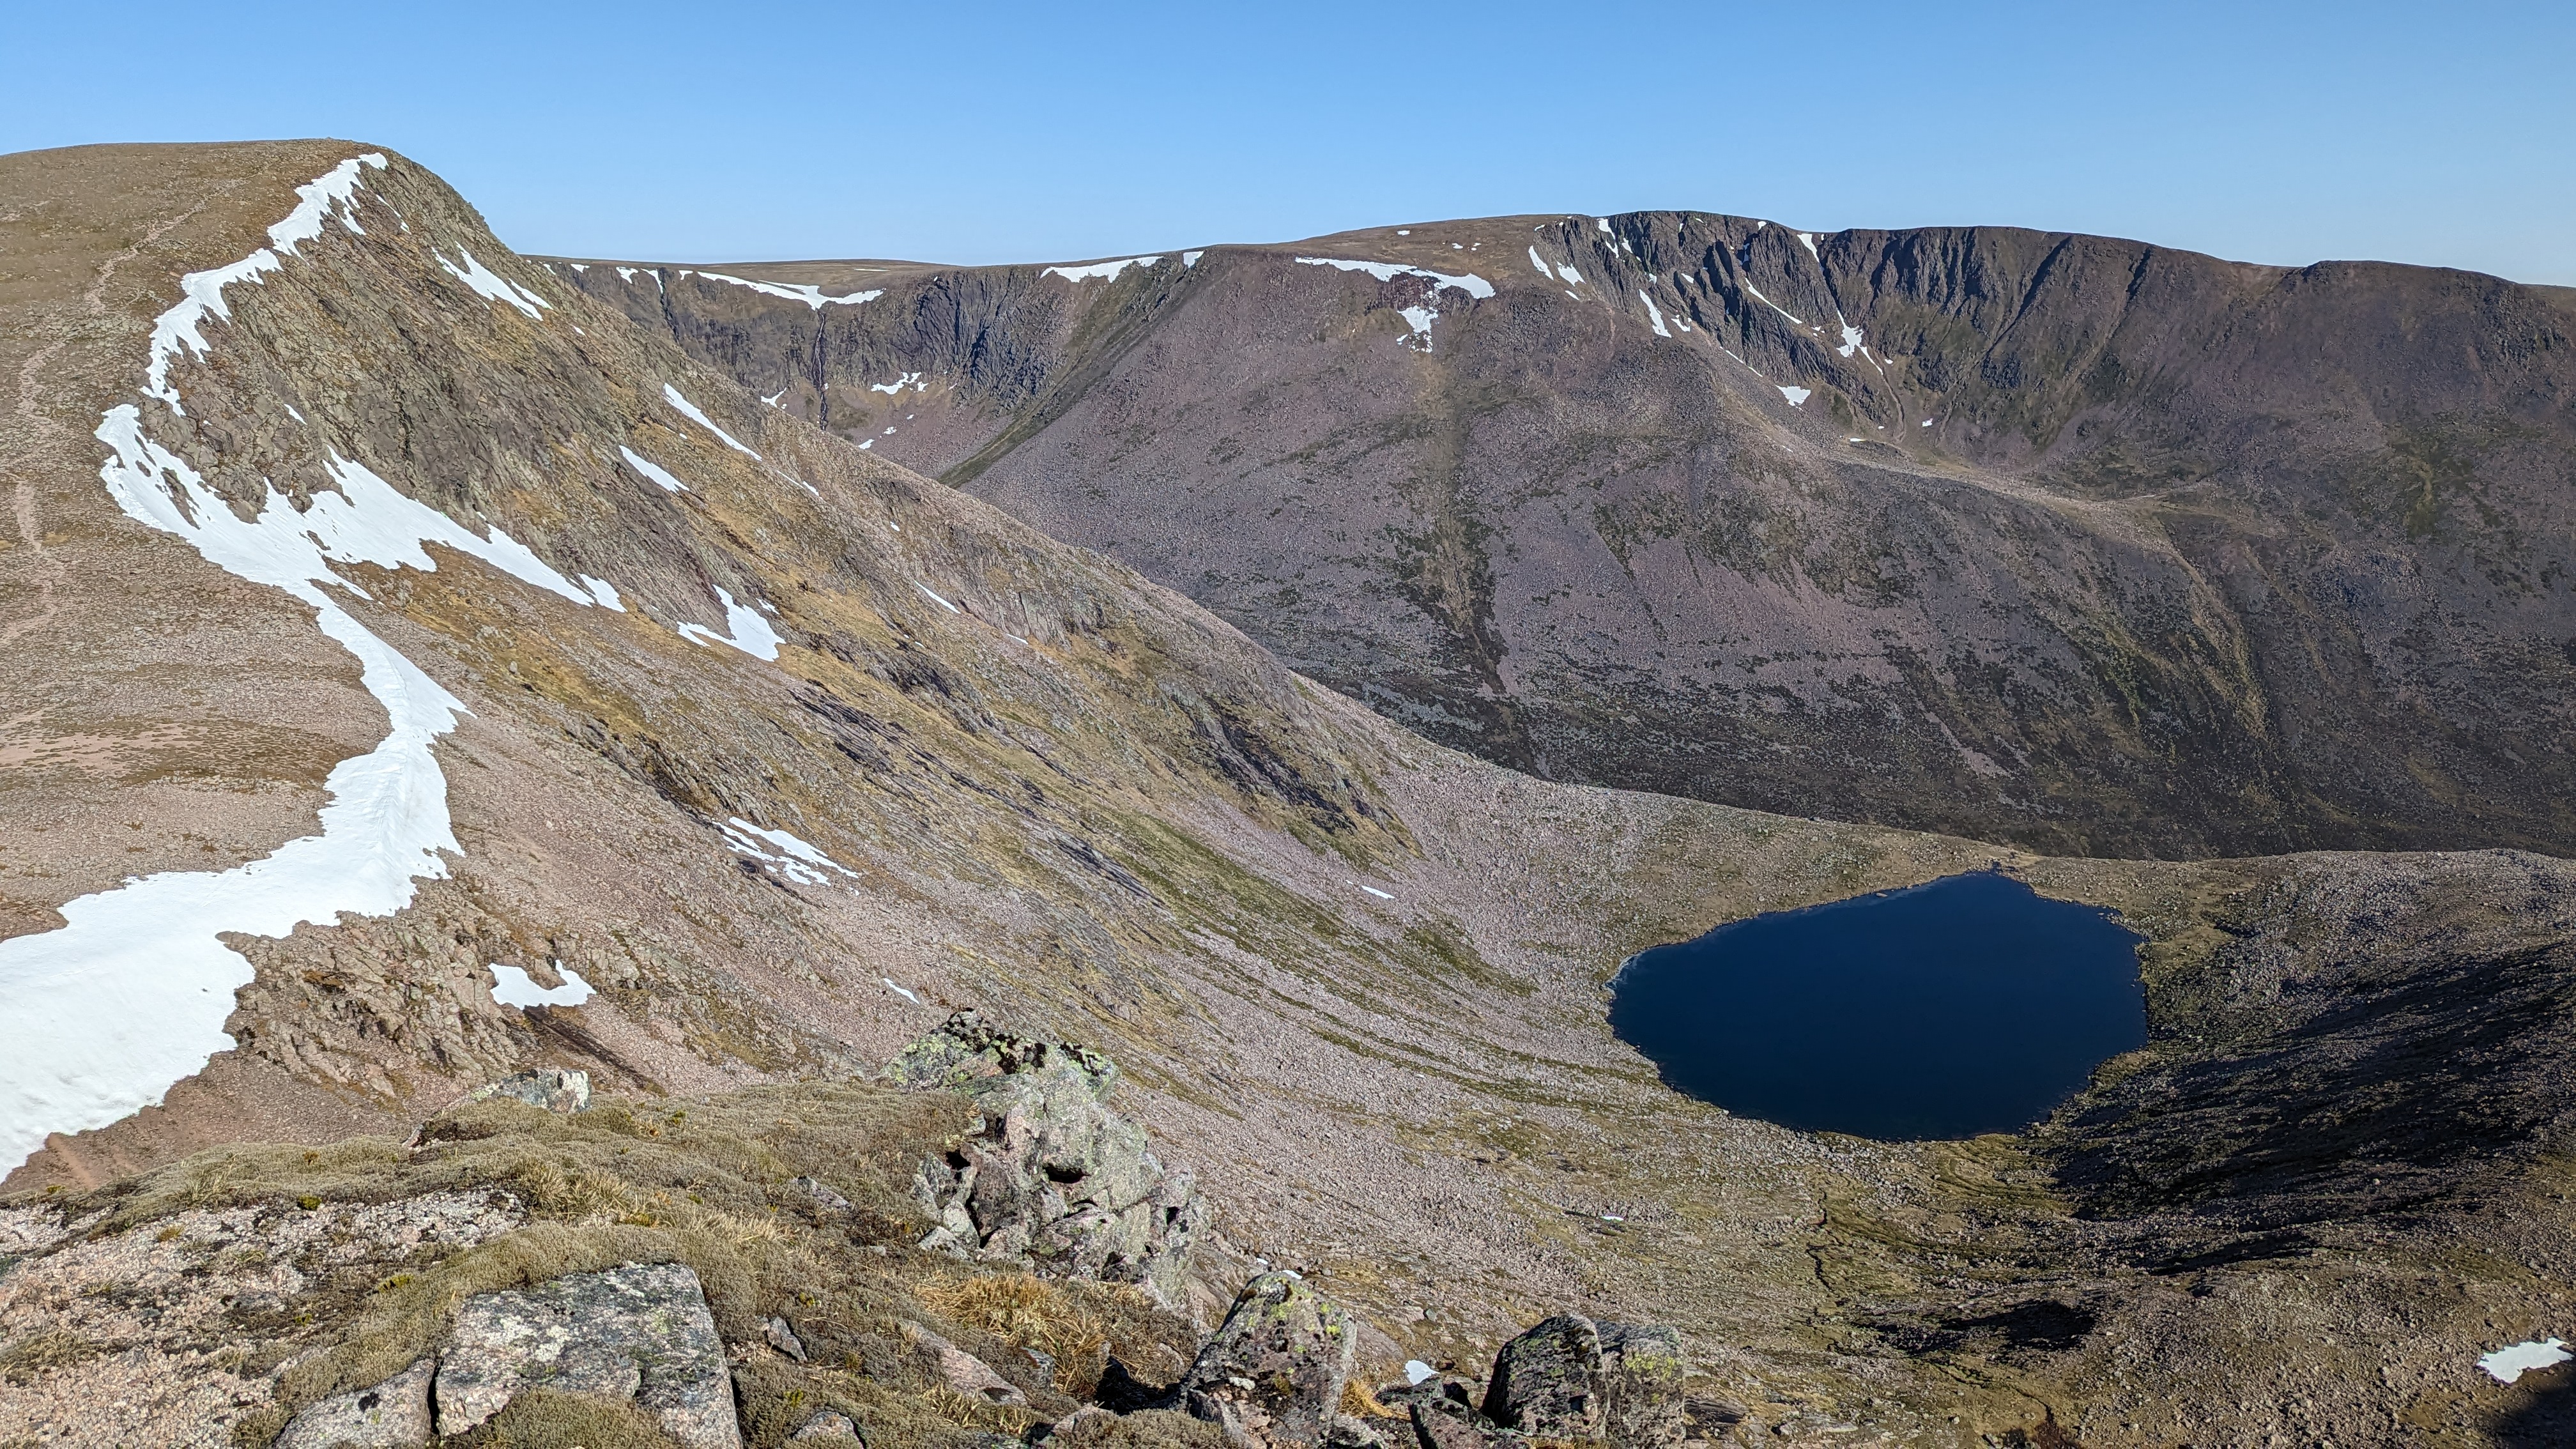
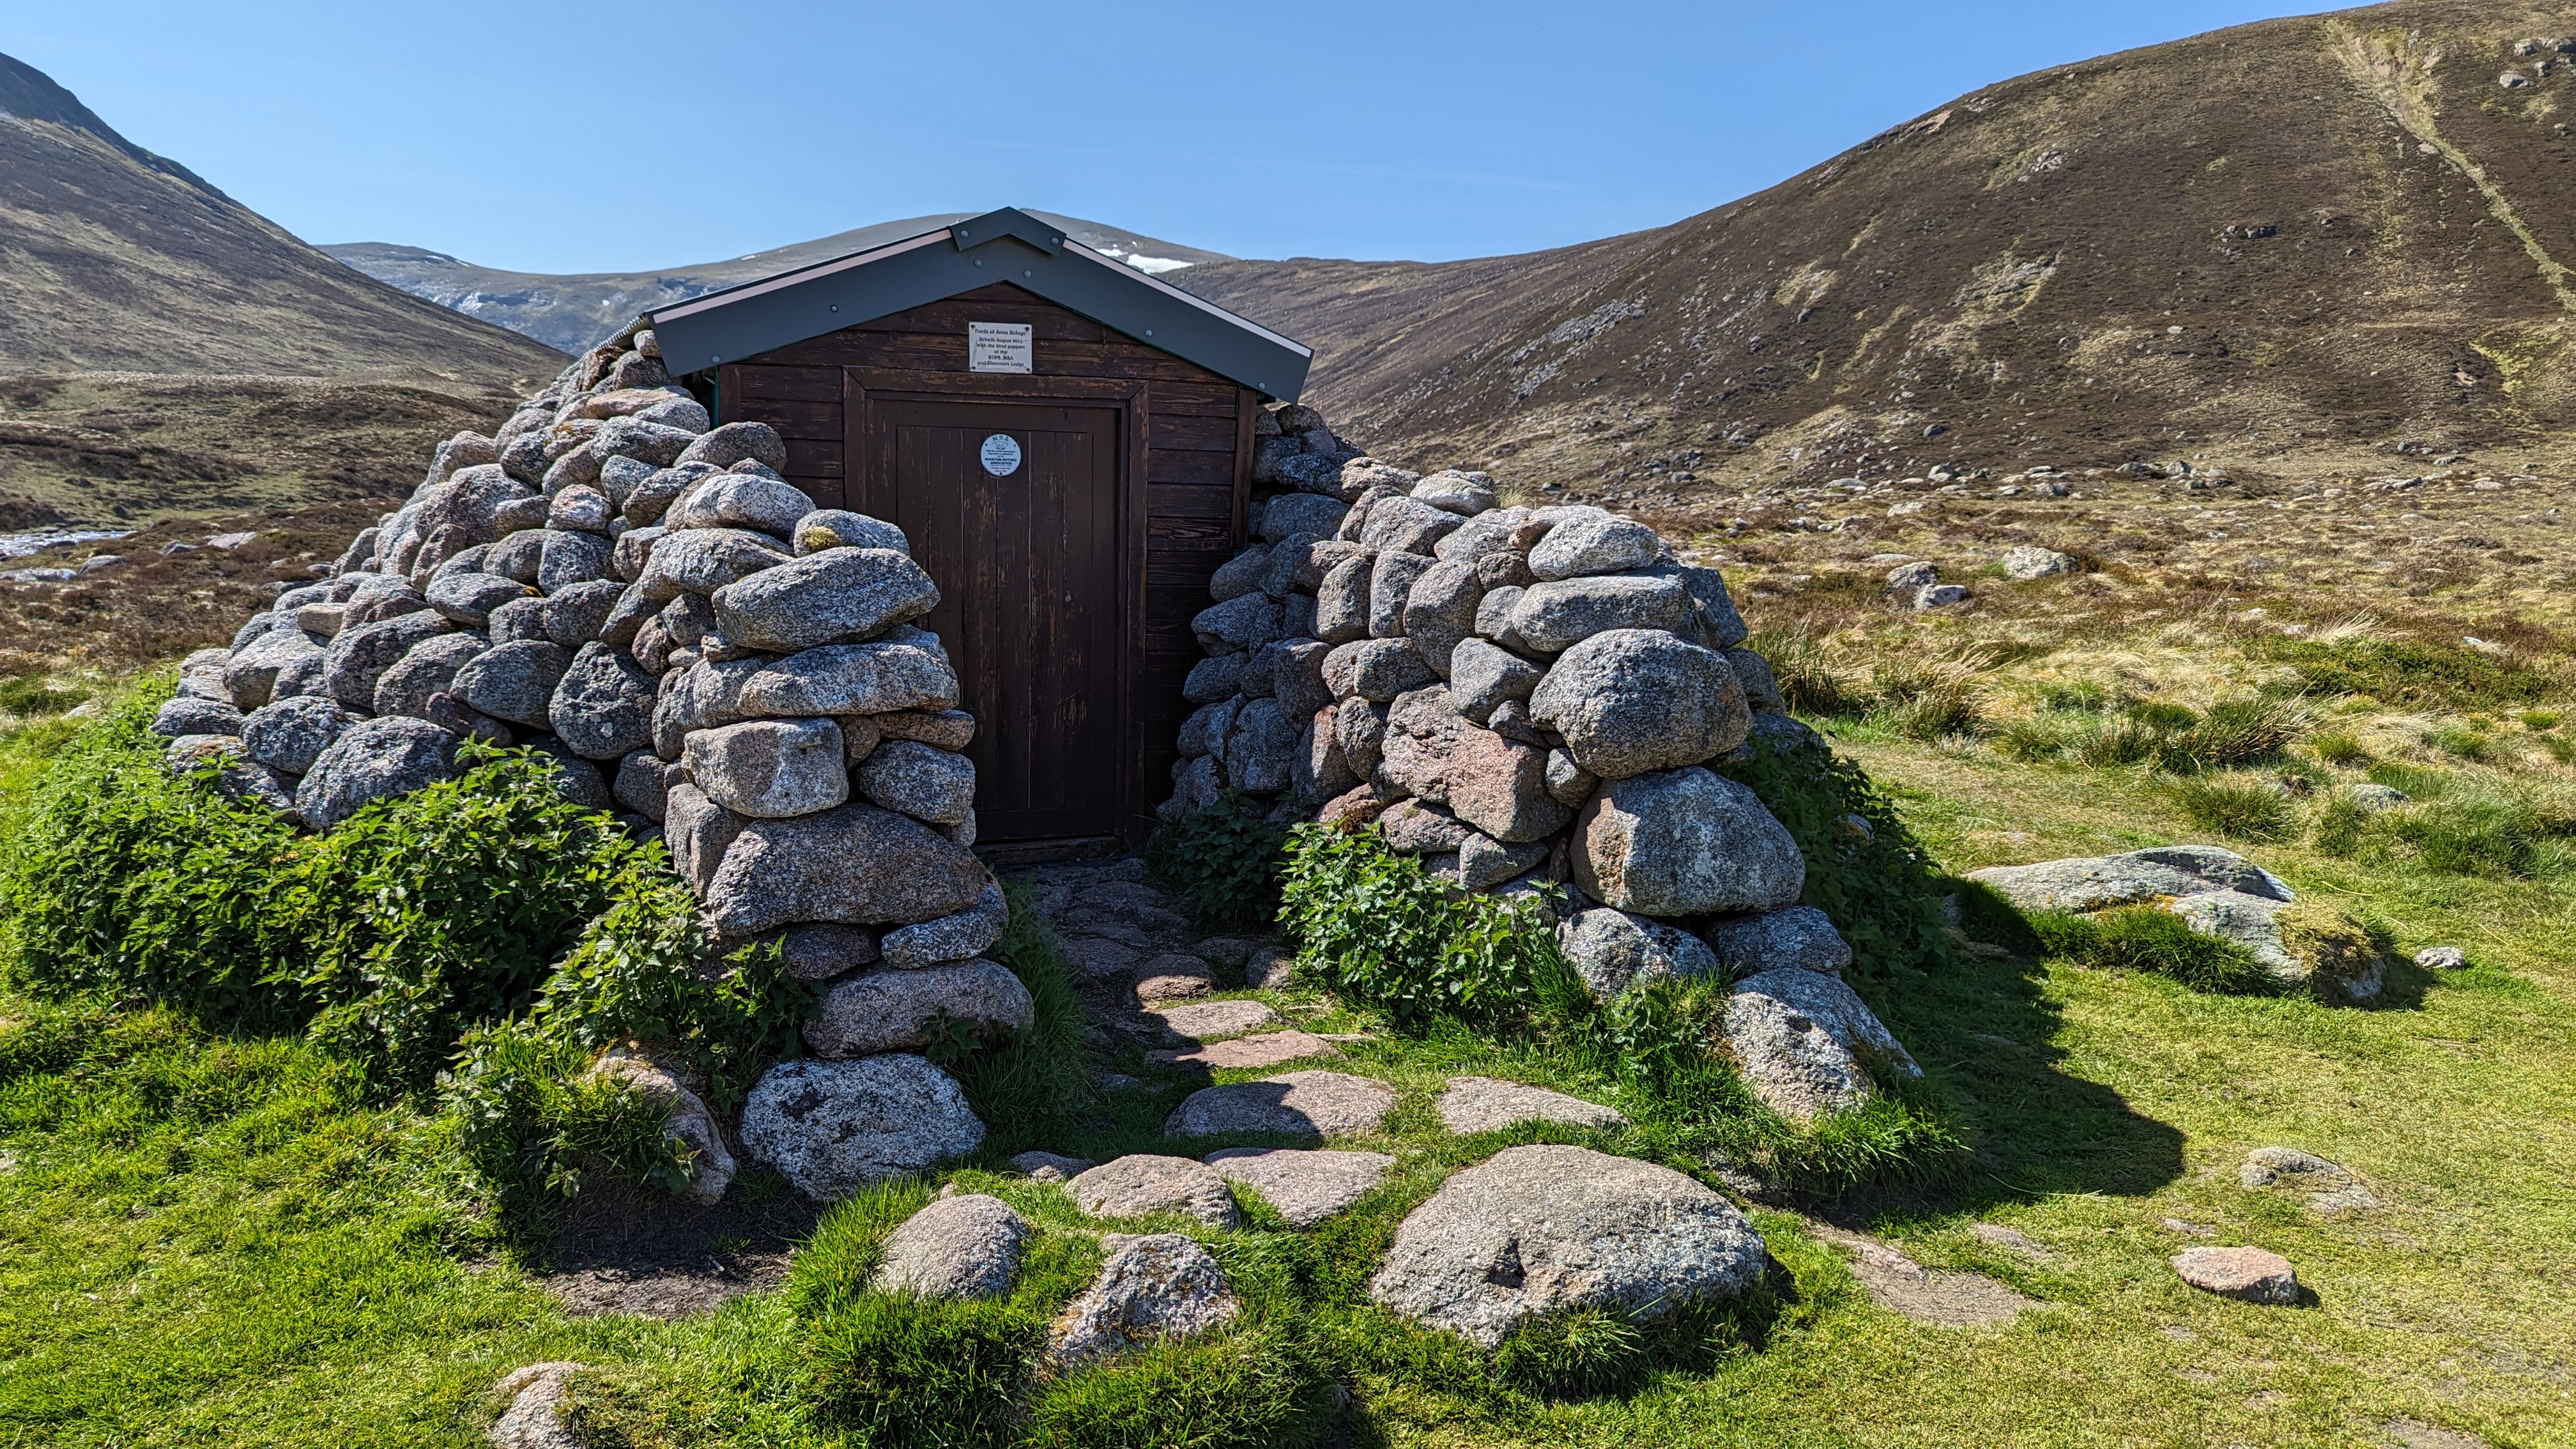
If you are inspired to spend time in the Cairngorms remember they are a truly wild place whose weather is rarely as kind as it was to me on this trip. Whilst my waterproof gear proved a dead weight, I would not have gone without it. Note also that once you are > 30 min from your entry point / road-end you will not get mobile phone coverage unless you are close to a skiing centre, I use a Garmin InReach Mini satellite tracker / communicator for walks like these which provides assurance to my family and the ability to contact either my family or the Mountain Rescue from anywhere with a view of the sky should that be required. Finally I must thank Mrs W who drove twice from her Aviemore campsite to Braemar to drop off and collect me.